How to Change the Oil in a R53 Mini Cooper Supercharger
The beautiful whining as you press the accelerator to the floor. The supercharger is music to any Cooper S owner's ears. This sound alone is one of the most distinguishable characteristics of a R53 mini cooper S. Now imagine what would happen if the oil in your supercharger had seeped out over years of driving, causing the inner workings to become dry, grinding against each other and rendering your supercharger useless. Not only would this be the end of the beautiful music, but it could also lead to an expensive fix. If your supercharger is not kept properly lubed for the entirety of its lifespan, it will break down over time, forcing you to either repair it, or replace it!
One common misunderstanding some people have is that a supercharger is lubricated when you add motor oil to your engine. Not true! The supercharger in your R53 has its separate oil reservoir and uses completely different oil than your engine.
Let’s talk about how you can change the fluid in your supercharger to keep it lasting for many miles to come!
The R53 mini came out of the factory with an Eaton brand supercharger, and was designed with two oil reservoir plugs. In order to change the oil in the supercharger, both reservoirs must be drained and then refilled individually. In order to do this process, you will need to remove the supercharger from the engine. Fear not! This process is not too difficult at all! However, if you are new at this process, it may take up the majority of an afternoon.
Step 1: The first phase of this project is to remove the bumper cover. There are a series of screws holding this on underneath on the bottom side. It’s not required, but may help to have the front of the mini lifted up off the ground a few inches. This can be done by using ramps on the front two wheels. There is a single screw located inside each fender well that will need to be removed, along with two Torx screws by the top of radiator. Once you have all these screws removed, you can pull the bumper cover off carefully, while also removing all the wiring connections to the lights, and the outside temperature sensor. Be careful when doing this step and avoid tugging on wires that are still connected to the bumper cover.
Step 2: With the bumper cover removed, it is now time to remove the bumper itself. It is held on by (8) nuts and (2) bolts. Some of the nuts are buried behind the bumper and will require you to use an extension socket to remove them. (pictured below)
Here we can see the bolt on the top left,
and the nut on the top right that will require us
to use an extension to remove them from the bumper.
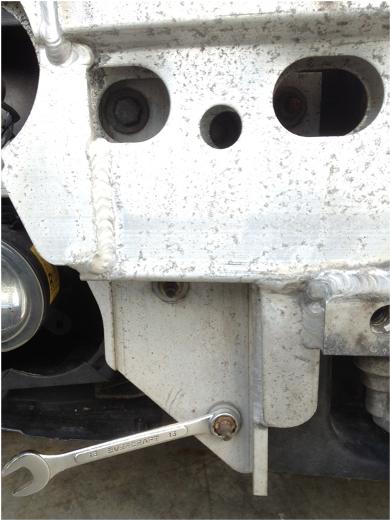
Step 3: Once the bumper has been removed, you will need to remove the two crush tubes that hold the bumper supports (connected to the bottom of the sub frame). In order to remove these, you must remove the bolts holding them onto the subframe which is located underneath the tubes. Once the bolts are removed from each crush tube, you can slide them out and off of the subframe. We removed these so that you can remove the radiator support in the steps coming soon!
Step 4: Now you want to prepare to remove the radiator support. First, you must drain the radiator of all the coolant. Looking at the front of the mini, there will be a radiator hose clip on the bottom right behind the radiator. Remove this clip (helps to use needle nose pliers or even channel locks) and pull the hose up and off the radiator. The fluid will come pouring out, so get a catch bucket to contain the mess! Again, this step is done easier if the front two wheels are on ramps.
Step 5: With the coolant drained, we can now remove the radiator support, but wait! You have to get that darn A/C condenser out of the way first. No worries, to remove the condenser simply remove the two bolts that attach it to the front of the radiator. Now you can lift the condenser up and off of the radiator. Note: We don’t have to disconnect any hoses or lines for this step. Once the A/C condenser is free, you can simply hang it below the car (see picture below).
Here is what your mini will look like at
this stage of the project. Notice the AC
condenser hanging underneath the car
and the radiator hoses plugged.
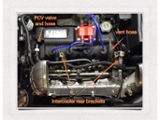
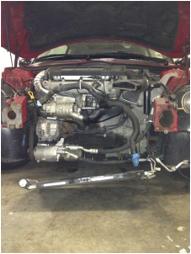
Step 6: Now it’s time to remove the radiator support along with the radiator itself. On the top left of the support, there is a radiator hose that needs to be removed just like the one you removed earlier. Once the radiator hoses are removed and drained, it helps to stuff a rag into the hoses to prevent them from dripping and making a mess of things. On the top right of the radiator support is an intake hose, this needs to be removed as well. To do this, you can simply unclip the connectors and pull it off. You will notice small black plastic clips that hold the radiator support to the wheel well fenders. There are a total of 8 clips. (4 per wheel well fender)/ Built into the radiator support are your horns. These are located at the bottom left and the bottom right. Unplug the wiring from each of these so that when the radiator support is pulled off, the wires are not damaged. At this point, you should take all the wiring from the lights, horns, ect, and push them back into the small channel built into the radiator support. Once all the wiring and connectors are removed from inside the radiator support, you will be able to finally pull the entire assembly straight out off of the car.
Step 7: The supercharger is driven by the serpentine belt, so in order to remove it, you must remove the serpentine belt. This is done easiest by using a serpentine belt removal tool, but if you are feeling handy, you can remove the belt using a flat bar to push the tensioner arm in, giving the belt enough slack to pull off.
Step 8: You are not far from having the supercharger removed! Let’s remove the intercooler that is sitting just on top of the supercharger. The plastic intercooler diverter is taken off by removing the Torx screws on the top. Now you will see the intercooler is being held on by two rubber intercooler bellows, each having a metal clamp and two screws. Remove these clamps and the rubber bellows on each side. Lastly, the intercooler is held down by mounting brackets. Unscrew these and you will be able to take the intercooler off.
Step 9: On the bottom of the engine is the long metal dipstick hose. This piece of metal must be removed so we can access the bottom of the supercharger properly. Unscrew the dipstick hose and remove it. Note: You do not want anything spilling into the cavity you just opened up. Find a means of plugging up this hole to prevent debris or fluid from getting into your engine oil.
Step 10: Congrats! You have made it to the supercharger. In a few minutes you will have it out of the car and can change the oil. To remove the supercharger, first remove the black intake tube bolt located on the bottom right of the supercharger. Next, unscrew the bolt connected to the belt tensioner on the far left of the supercharger. Next, you need to remove the off-white plastic vacuum line. This line uses a tool-less clip on design. To remove it, press firmly down on the red connector, and pull the vacuum line straight up. Be careful not to bend the line too much, it is not designed to be flexible and can snap if you aren’t careful, eek! Looking just above the supercharger, you will see the radiator hose we removed earlier. Unscrew the radiator hose mounting clamp (right above where you removed the vacuum line). Next, lets remove the hose that is connected to the water pump side of the supercharger. To do this, you want a pair of long pliers to reach in and unclip the hose clamps. This can be tricky since the water pump hose is tucked in a little bit. Once you have done this, you are (4) mounting screws away from having the supercharger out! There are two mounting screws on the top left by the pulley just below the metal horn. There is a mounting screw directly to the left of where you removed the vacuum line. Lastly, there is a mounting screw on the bottom of the supercharger just above where the dipstick tube was. Good work, the supercharger is now free, and can be removed by pulling it carefully out of the black plastic intake tube and away from the engine. You did it!
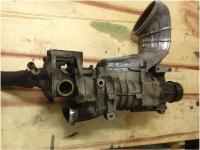
Here is what the supercharger will
look like when you have removed it
from the engine. Notice how water
pump is connected to this assembly
Step 11: Lets drain the old oil from the supercharger. There is an allen screw by the bottom of the water pump, and an allen screw by pulley just below the metal horn. Remove these screws and drain each reservoir of the old oil. Cross your fingers that there is a good amount of oil inside!
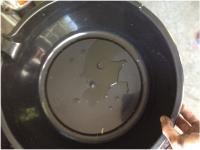
This picture shows how little oil was
left in my 2003 Mini Cooper S supercharger,
a tiny puddle! Uh Oh!
Step 12: Now let’s add the new oil! Since the supercharger has (2) oil reservoirs, you will fill each one individually. To do this, ensure the supercharger is on a level surface, and fill each reservoir with oil until it begins to seep out, and then tighten the allen screws back on.
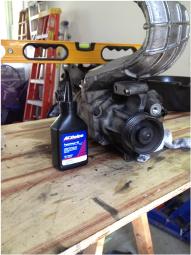
Here we have the supercharger sitting level
next to a 4oz bottle of supercharger oil.
You will need slightly less than two bottles of
this oil, you can buy it off MiniMania.com!
Step 13: Once you have topped off your oil and tightened up the reservoir screws, you’re all done, now all you have to do is reverse the steps and put her back in! Note: while you have the supercharger out of the engine, why not clean it and make it look shiny new before putting it back in?
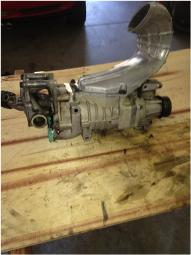
There the supercharger sits all clean
and topped off with oil!
Thank you for reading! Please feel free to comment with questions.
added 12/01/2015
NOTE: The Supercharger nose gear (pulley side) takes 4.9 oz. and the rear side water pump gear takes about 1.4 oz - as specified by Eaton. Basically, with the supercharger on the motor, you need to use a syringe to suction out all fluid and fill with new as specified. Tighten the reservoir plugs to 8 ft-lbs.
|


 NME7250$16.12