
| Orig. Posting Date | User Name | Edit Date |
| Nov 7, 2023 04:11AM | 6464s | |
| Nov 6, 2023 05:16PM | h_lankford | |
| Oct 5, 2023 08:17AM | 6464s | Edited: Oct 6, 2023 03:20AM |
| Oct 1, 2023 10:19PM | Whee | |
| Oct 1, 2023 05:32PM | h_lankford | |
| Oct 1, 2023 04:01PM | theminimark | |
| Sep 30, 2023 11:29AM | MartinGreenbank | |
| Sep 30, 2023 03:01AM | 6464s | Edited: Sep 30, 2023 03:21AM |
| Sep 29, 2023 05:28PM | MartinGreenbank | Edited: Sep 29, 2023 05:28PM |
| Sep 29, 2023 09:50AM | Willie_B | |
| Sep 29, 2023 08:42AM | 6464s | Edited: Sep 29, 2023 08:46AM |
| Sep 29, 2023 07:46AM | Willie_B | |
| Sep 29, 2023 04:11AM | 6464s | Edited: Sep 29, 2023 04:39AM |

|
Total posts: 501
Last post: Apr 19, 2024 Member since:Jan 25, 2017
|
Cars in Garage: 0
Photos: 0 WorkBench Posts: 0 |
Under the dist cap, a white residue builds up at the terminal posts.
Take a Dremel with a wire brush attachment to remove and a light file to the rotor.
You'll notice the performance right away.
|
|
Total posts: 2037
Last post: Mar 29, 2024 Member since:Aug 29, 2001
|
Cars in Garage: 0
Photos: 0 WorkBench Posts: 0 |
|
I did NOT undo the difficult-to-get-at lower radiator hose to drain the system. This took under 30 min.
Steps 1. loosen clamp and twist off the radiator end of the short UPPER radiator hose. Temporarily plug the radiator inlet with a rag. 2. turn end of the upper radiator hose toward the front and downward. insert hose into a pipe (I used a fishing rod holder pipe) 3. Aim the pipe into a 5 gallon bucket 4. Warm up the engine with the radiator cap OFF. 5. When thermostat opens and coolant flows (into the bucket) immediately start pouring distilled water into the radiator fill neck. I used 1 gallon. Need to wait once or twice as the thermostat will close from cool water. Heats back up quickly. The 1 gallon will flush out all the old coolant. You will see the flow turn clear. 6. Keep the engine running and this time pour new 50/50 mix. I used 1 gallon. ( If you are concerned about the strength, you could run a second gallon of 50/50 through there or add some full strength coolant. 7. Turn off engine. Reinstall upper radiator hose and radiator cap. Test drive and recheck coolant level.
|
|
Total posts: 501
Last post: Apr 19, 2024 Member since:Jan 25, 2017
|
Cars in Garage: 0
Photos: 0 WorkBench Posts: 0 |
After removing the old rocker, and welding patch panels to the inner sill/ floor pan, you are ready to weld in the replacements.
Here's where I deviate, anytime you lap metal together rust starts and in the case of the mini it rots through and that's exactly were we are.
Across the entire lower length of the new rocker panel, I drill or punch 1/4 inch holes about 3/8 of an inch from edge, maybe 2 inch spacing. For the upper that comes in contact with door step seam and body seam, I leave alone. I will drill or punch 3/16 inch holes the length of the rocker. It is much easier to weld from the top of something than to weld upside down.
Now we can weld. Align the rocker panel on the lower seam and clamp. Plug weld 3 holes; one on each end and in the middle, all from the top.
Here's the tip - I put an1/4 inch stainless washer as a spacer between the outside of the floor pan and the new inside rockers. Use the predrilled holes on the rocker you made earlier and align the SS washer hole and Plug weld. Make sure you are welding to the floor pan, otherwise you are just welding a washer to the rocker panel.
The created space will allow the moisture to constantly flow out. You can do this to the rear valance and the rear splash panel and the area where the front panel attaches to the inner wing.
Just a side note. I got some sheet stainless steel and made my patch panels out of them for the inner sills of the floor pan. I live in the north east and we use salt on the roads, the mini is my only car, sadly it sits outside. I used a urethane seam sealer to smooth things out. I used Sherwin Williams Macropoxy 2 part primer and Acrolon 2 part top coat for the paint. I get spray cans of paint mixed with my color formula to match as a top coat. I've been very happy with the performance.
Let me know what you think.
|
|
Total posts: 3346
Last post: Apr 21, 2024 Member since:Jul 20, 2002
|
Cars in Garage: 0
Photos: 0 WorkBench Posts: 0 |
|
|
|
Total posts: 2037
Last post: Mar 29, 2024 Member since:Aug 29, 2001
|
Cars in Garage: 0
Photos: 0 WorkBench Posts: 0 |
|
|
|
Total posts: 694
Last post: Apr 13, 2024 Member since:Aug 6, 2002
|
Cars in Garage: 0
Photos: 0 WorkBench Posts: 0 |
|
Whenever you work on a "Wok" clutch cover on a mini, don't put in the bolt that is at about 7 o'clock. ( this is whether the powertrain is in the subframe or out - because next time you'll appreciate not having to mess with that. ) With all of the others in place, the wok is held down just fine. If I remember correctly, the bolt has a 7/16" head, so you should also be sure to have a swivel head ratcheting box end wrench for fitting in between the subframe and powertrain and working more quickly.
Lastly, beware of the quality of the "Throwout / Release bearing" during a clutch replacement. Recently, two known cases of clutch problems have been linked to them.
Best, MSH
|
|
Total posts: 236
Last post: Apr 9, 2024 Member since:Feb 27, 2007
|
Cars in Garage: 6
Photos: 20 WorkBench Posts: 0 |
|
|
Total posts: 501
Last post: Apr 19, 2024 Member since:Jan 25, 2017
|
Cars in Garage: 0
Photos: 0 WorkBench Posts: 0 |
I pulled my front subframe out to epoxy paint it, put the engine back in the cradle and rolled it back under. I made a dolly wheel set out of bent steel and two 5 inch swivel wheels, then bolted to the front of the subframe. That stabilize the frame on four wheels. I'll try to take a picture.
I don't get how the slide hammer works. What does it attach to?
Here's a tip for the mice problem - use moth balls. I cut the bottom of soda bottles, but you can use paint caps, etc. Fill it with moth balls and place them at the corners of the bulkhead in the engine bay, inside the mini, and add a couple balls at each end of the opening of the fresh air pipes.
|
|
Total posts: 236
Last post: Apr 9, 2024 Member since:Feb 27, 2007
|
Cars in Garage: 6
Photos: 20 WorkBench Posts: 0 |
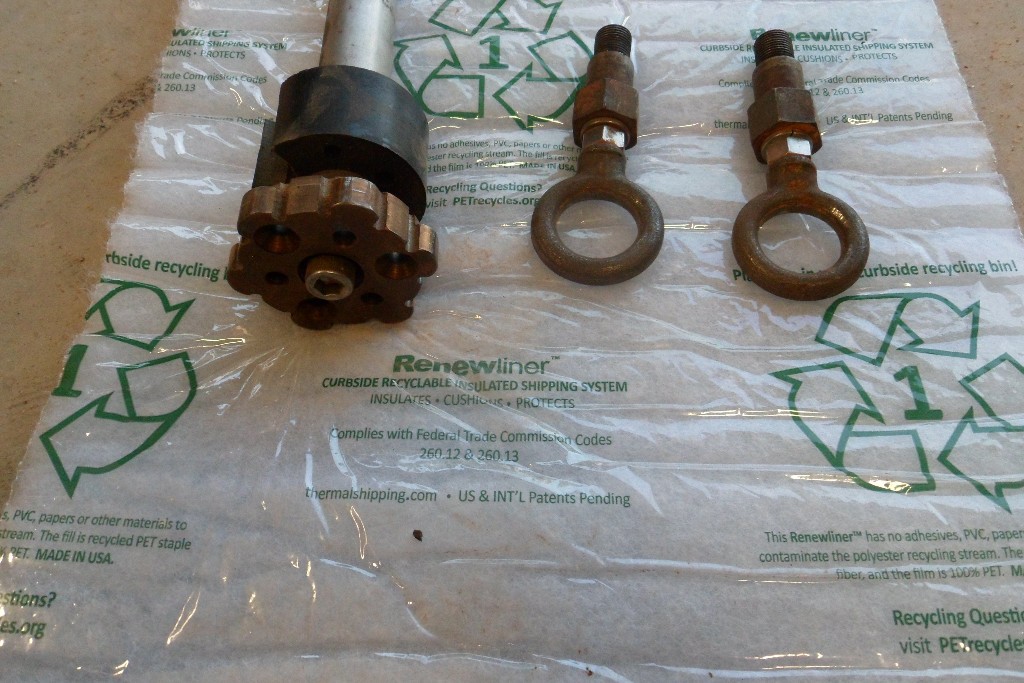 Great idea for a thread!
 So, on the right is how I've been lifting the engines out of my minis for 50+ years, a lifting hook welded to scrap spark plugs, it pulls it at a nice angle that tilts back as you lift.
On the left is a slide hammer that I've used to pull out the pot joints off the differential. I've no need for it anymore so a bottle of Vodka buys it. Hardened St.St. Not too sure why I added the PVC block but it must have had a reason!
More tips to come!
|
|
Total posts: 2525
Last post: Apr 27, 2024 Member since:Dec 1, 2002
|
Cars in Garage: 0
Photos: 0 WorkBench Posts: 0 |
|
"How can anything bigger be mini?"
|
|
Total posts: 501
Last post: Apr 19, 2024 Member since:Jan 25, 2017
|
Cars in Garage: 0
Photos: 0 WorkBench Posts: 0 |
|
|
Total posts: 2525
Last post: Apr 27, 2024 Member since:Dec 1, 2002
|
Cars in Garage: 0
Photos: 0 WorkBench Posts: 0 |
|
I paint the flat end of the wheel studs white to make them easier to see when installing the wheels.
"How can anything bigger be mini?"
|
|
Total posts: 501
Last post: Apr 19, 2024 Member since:Jan 25, 2017
|
Cars in Garage: 0
Photos: 0 WorkBench Posts: 0 |
What to do with used parts. I try not to throw away parts that I've replaced because you never know.
Tip. I just replaced the two front rubber brake line hoses. What to do with this part that I'll never use? I cut off the two metal ends. Using my cutoff wheel, I put two spiral grooves in the threads. Now, I just made a brake line tap.
Trick. When replacing the bottom hose of the radiator in situ, I align the clamp with the nut side towards the fire wall, make it fairly loose, so it will allow the hose and clamp to slide over the ridge of the radiator oulet. I coat the inside of the hose with a little petroleum jelly to help it slide. From the top, I use a broom stick handle to push the hose on. Again from the top, I use a couple of long extensions of my rachet to tighten the clamp nut between the rad hose and the subframe.
My hope is that others that do the work on their mini will share their tips and tricks.


