
| Orig. Posting Date | User Name | Edit Date |
| Dec 18, 2017 02:41PM | thebluepotato | |
| Dec 18, 2017 01:52PM | thebluepotato | Edited: Dec 18, 2017 02:06PM |
| Dec 18, 2017 01:30PM | jedduh01 | Edited: Dec 18, 2017 09:29PM |
| Dec 18, 2017 09:47AM | malsal | Edited: Dec 19, 2017 07:57AM |
| Dec 18, 2017 06:05AM | thebluepotato | Edited: Dec 18, 2017 06:22AM |
| Dec 16, 2017 01:56PM | malsal | Edited: Dec 16, 2017 02:57PM |
| Dec 16, 2017 08:59AM | Dan Moffet | |
| Dec 16, 2017 08:33AM | CooperTune | |
| Dec 16, 2017 08:23AM | malsal | |
| Dec 16, 2017 07:17AM | CooperTune | |
| Dec 15, 2017 01:44PM | 1963SV2 | |
| Dec 15, 2017 01:35PM | thebluepotato | |
| Dec 15, 2017 01:32PM | h_lankford | |
| Dec 15, 2017 01:14PM | thebluepotato | |
| Dec 15, 2017 01:05PM | Dan Moffet | |
| Dec 15, 2017 12:43PM | thebluepotato | Edited: Dec 15, 2017 01:01PM |

|
Total posts: 288
Last post: Jun 9, 2020 Member since:May 13, 2010
|
Cars in Garage: 1
Photos: 17 WorkBench Posts: 1 |
|
I think the master and valve is working correctly now....I have pressure in the front and will continue to bleed next week a last time. Will post here once I feel confident it is solved.
Appreciate everyones help!
-------------------------------------------------------------------------------
Check out my Classic Mini Podcast - Classic Mini Breakdown, www.classicminibreakdown.com
Basil - 1974 Mini 1000 /// THE BLOG: www.thebluepotato.net/blog
-------------------------------------------------------------------------------
|
|
Total posts: 288
Last post: Jun 9, 2020 Member since:May 13, 2010
|
Cars in Garage: 1
Photos: 17 WorkBench Posts: 1 |
|
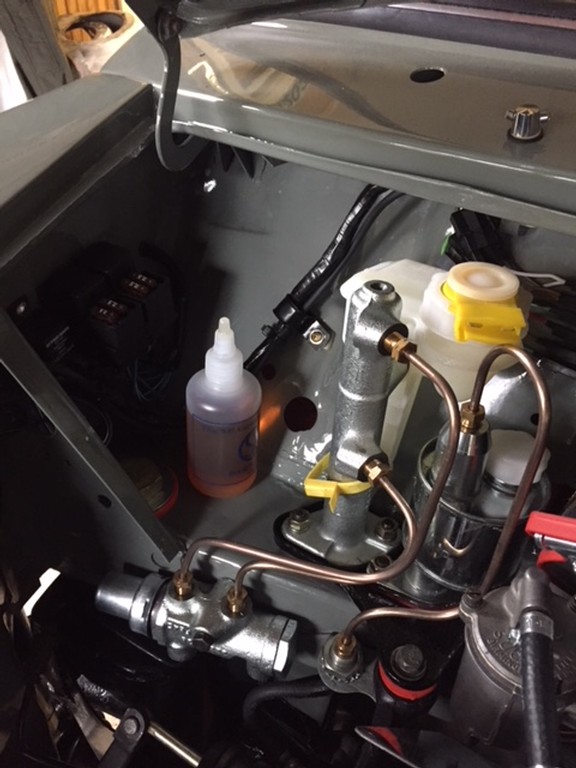
Top of master went should go to the (clutch side) of the valve (notice the red nuts on the old lines)
bottom of master - Fender /wing side of valve.
- your NEW setup is opposite.
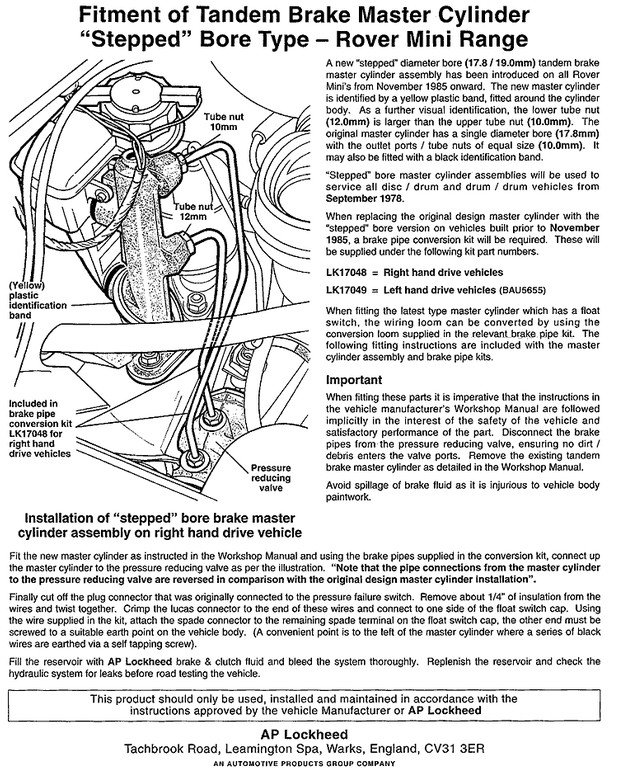
Then the'es the factory instructions for a NEW GMC277 Master = and they have the two sized nuts on the amster that it doesnt look like your cylnder has
It would make sense you have swapped lines. the Valve is 'working' and reducing the pressuer and flow to the FRONT brakes where it should reduce to the rear.
Goodluck
-------------------------------------------------------------------------------
Check out my Classic Mini Podcast - Classic Mini Breakdown, www.classicminibreakdown.com
Basil - 1974 Mini 1000 /// THE BLOG: www.thebluepotato.net/blog
-------------------------------------------------------------------------------
|
|
Total posts: 1649
Last post: Jun 22, 2022 Member since:Apr 30, 2009
|
Cars in Garage: 0
Photos: 0 WorkBench Posts: 0 |
|
 Please double check your archive pics vs your current setup. I swear by my eye you have them reversed Old setup to new setup.
Top of master should go to the (clutch side) of the valve (notice the red nuts on the old lines)
bottom of master - Fender /wing side of valve.
- your NEW setup is opposite of this.
Just for guidance
:Then the factory instructions for a NEW GMC277 Master = and they have the two sized nuts on the NEW master.
It would make sense you have swapped lines. the Valve is 'working' and reducing the pressire and flow to the FRONT brakes where it should reduce to the rear.
Goodluck
Sorry for horrible typing.. on mobile.
|
|
Total posts: 8382
Last post: Jan 13, 2022 Member since:Feb 7, 2006
|
Cars in Garage: 0
Photos: 0 WorkBench Posts: 0 |
|
EDIT: Not sure what year your car is but from late 1985 they used a different Master cylinder with a yellow band and replaced the previous ones which yours seems to have. These masters have different sized unions/fittings on the ports. Looking at Haynes book of lies 69 thru 83 page 329 it shows a master plumbed the same as yours.
The two cars i referenced do not have yellow band masters as they are both 1979 and 1982 models so maybe that is where the difference is
If in doubt, flat out. Colin Mc Rae MBE 1968-2007.
Give a car more power and it goes faster on the straights,
make a car lighter and it's faster everywhere. Colin Chapman.
|
|
Total posts: 288
Last post: Jun 9, 2020 Member since:May 13, 2010
|
Cars in Garage: 1
Photos: 17 WorkBench Posts: 1 |
|
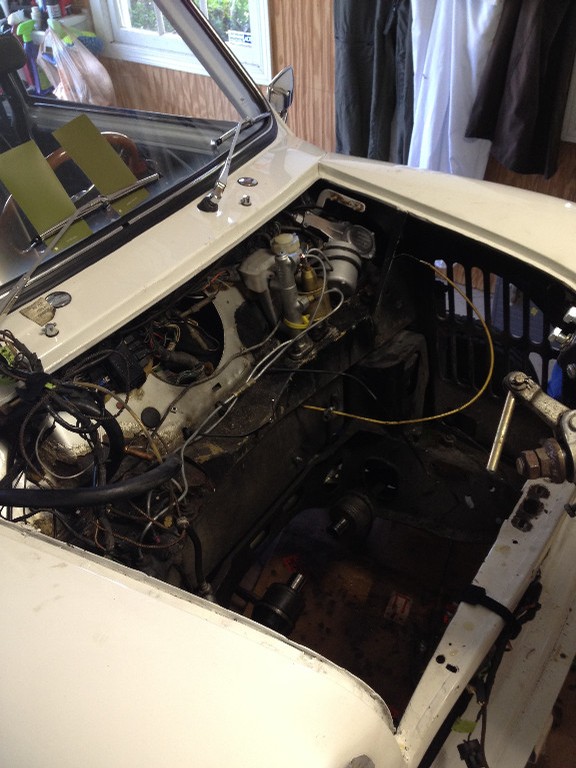
EDIT: I just looked at two Mini's with dual circuits and working brakes and both are plumbed opposite to yours. The top line on the master cylinder is going to the port nearest the engine and the bottom line is going to the port closest to the inner fender.
Saw this blog as well:
//waynesminiprogress.blogspot.com/2015/08/brake-cylinder-and-limiter-valve.html
//waynesminiprogress.blogspot.com/2015/09/new-brake-limiter-valve.html
-------------------------------------------------------------------------------
Check out my Classic Mini Podcast - Classic Mini Breakdown, www.classicminibreakdown.com
Basil - 1974 Mini 1000 /// THE BLOG: www.thebluepotato.net/blog
-------------------------------------------------------------------------------
|
|
Total posts: 8382
Last post: Jan 13, 2022 Member since:Feb 7, 2006
|
Cars in Garage: 0
Photos: 0 WorkBench Posts: 0 |
|
EDIT: I just looked at two Mini's with dual circuits and working brakes and both are plumbed opposite to yours. The top line on the master cylinder is going to the port nearest the engine and the bottom line is going to the port closest to the inner fender.
If in doubt, flat out. Colin Mc Rae MBE 1968-2007.
Give a car more power and it goes faster on the straights,
make a car lighter and it's faster everywhere. Colin Chapman.
|
|
Total posts: 9546
Last post: Apr 26, 2024 Member since:Aug 14, 2002
|
Cars in Garage: 0
Photos: 0 WorkBench Posts: 0 |
|
(Very NICE!)
.
"Hang on a minute lads....I've got a great idea."
|
|
Total posts: 4134
Last post: Oct 13, 2020 Member since:Oct 8, 2011
|
Cars in Garage: 0
Photos: 0 WorkBench Posts: 0 |
|
|
|
Total posts: 8382
Last post: Jan 13, 2022 Member since:Feb 7, 2006
|
Cars in Garage: 0
Photos: 0 WorkBench Posts: 0 |
|
If in doubt, flat out. Colin Mc Rae MBE 1968-2007.
Give a car more power and it goes faster on the straights,
make a car lighter and it's faster everywhere. Colin Chapman.
|
|
Total posts: 4134
Last post: Oct 13, 2020 Member since:Oct 8, 2011
|
Cars in Garage: 0
Photos: 0 WorkBench Posts: 0 |
|
|
|
Total posts: 1716
Last post: Oct 18, 2020 Member since:Oct 18, 2011
|
Cars in Garage: 0
Photos: 0 WorkBench Posts: 0 |
Obviously
 you have a big bubble somewhere (not that that's much help).
 In the past I have found the only solution to be to crack each joint and bleed out any air moving outwards from the connection at the top of the master cylinder. It works but can be messy ...and all that nice new paint

Cheers, Ian
|
|
Total posts: 288
Last post: Jun 9, 2020 Member since:May 13, 2010
|
Cars in Garage: 1
Photos: 17 WorkBench Posts: 1 |
|
-------------------------------------------------------------------------------
Check out my Classic Mini Podcast - Classic Mini Breakdown, www.classicminibreakdown.com
Basil - 1974 Mini 1000 /// THE BLOG: www.thebluepotato.net/blog
-------------------------------------------------------------------------------
|
|
Total posts: 2037
Last post: Mar 29, 2024 Member since:Aug 29, 2001
|
Cars in Garage: 0
Photos: 0 WorkBench Posts: 0 |
|
|
|
Total posts: 288
Last post: Jun 9, 2020 Member since:May 13, 2010
|
Cars in Garage: 1
Photos: 17 WorkBench Posts: 1 |
|
-------------------------------------------------------------------------------
Check out my Classic Mini Podcast - Classic Mini Breakdown, www.classicminibreakdown.com
Basil - 1974 Mini 1000 /// THE BLOG: www.thebluepotato.net/blog
-------------------------------------------------------------------------------
|
|
Total posts: 9546
Last post: Apr 26, 2024 Member since:Aug 14, 2002
|
Cars in Garage: 0
Photos: 0 WorkBench Posts: 0 |
|
.
"Hang on a minute lads....I've got a great idea."
|
|
Total posts: 288
Last post: Jun 9, 2020 Member since:May 13, 2010
|
Cars in Garage: 1
Photos: 17 WorkBench Posts: 1 |
|
 Guys - in a quandary here. Have a new PWDA (FAM7821) for my Mk4 with aft mkt Cooper S brake kit on fronts (dual system front back split). Standard drums on rear. All new brake lines, no leaks at connectors. Have bled the system correctly and rears and pressurizing perfectly, but cannot get the fronts to pressurize at all. Its only when using the brake pedal that I am getting nothing at front. All fluid is running clear with no bubbles with speed bleeder. Using standard DOT4 with new brake master.
Anyone have any ideas on how to triage this a bit more? Any ideas why not getting pressure to front.
My fear is that the PWDA is defective and not servicable (obviously).
-------------------------------------------------------------------------------
Check out my Classic Mini Podcast - Classic Mini Breakdown, www.classicminibreakdown.com
Basil - 1974 Mini 1000 /// THE BLOG: www.thebluepotato.net/blog
-------------------------------------------------------------------------------


