How to Reset the Brake Wear Service Warning Sensor
on Your MINI Cooper (2002+)
What Does a Red MINI Cooper Warning Lights Mean?
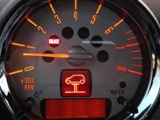
If you see a Red Warning light pop up on your MINI Cooper dash... it's worth paying attention to! The Red Warning light means your brake system is malfunctioning in some way.
Please drive carefully and make an appointment at your local MINI Dealer or Mechanic as soon as you can. And if you're a DIYer and have already completed your repairs, check out the information below on Resetting Your MINI's Warning Light.
Quick Links to Resetting Your Brake Wear Sensor on Your MINI:
- GEN1 Models R50 - R53 (2002 - 2006)
- GEN2 Models R55 - R61 (2007 - 2016)
- GEN3 Models F54-F60 (2016 - current year)
Other Brake-Related Articles for Your MINI Cooper:
- Brakes and Brake Parts at Mini Mania.
- Brake Sensors we offer at Mini Mania
- Looking for MINI Cooper Brake Lights?
When the Brake Wear Service indicator illuminates, one of the two Brake Wear Warning Sensors has been triggered. The brake wear sensor is a wire loop that gets worn down against the rotor. Once the wire is worn thru and the circuit is opened, the brake wear indicator is illuminated The MINI has a brake wear sensor in the front left wheel, and the right rear wheel.
After replacing the worn sensor, reset the sensor service warning indicator with the following relevant procedure(s):
Reset for Generation 1 ("Gen1") MINI Cooper:
- 2002-2006 R50 Hardtop/Hatchback MINI Cooper
- 2005-2008 R52 Convertible MINI Cooper
- 2002-2006 R53 Hardtop/Hatchback MINI Cooper
-
- Turn the ignition key to the #2 position for around 30 seconds without turning over the engine
- The warning indicator should go out!
Reset for Generation 2 ("Gen2") MINI Cooper:
- 2007-2014 R56 Hardtop/Hatchback MINI Cooper
- 2008-2015 R55 Clubman MINI Cooper
- 2009-2015 R57 Convertibles MINI Cooper
- 2012-2015 R58 Coupe MINI Cooper
- 2012-2015 R59 Roadster MINI Cooper
- 2011-2016 R60 Countryman MINI Cooper
- 2013-2016 R61 Paceman MINI Cooper
To enter the service Menu:
- Insert Key
- Do not press clutch / brake
- Press Start button
- Wait until the Car / relevant Service warning symbol disappears on the Rev counter display
- Immediately after the symbol goes out Press and hold Both buttons on the Rev Counter
- Continue to hold - the system will run a dash light check
- Continue to hold
- Display will then show VIN / Menu - continue to hold through this until the time reappears on the display
- Now release only the right-hand button (trip reset) for about a second, and then press and hold again (whilst still holding the left-hand button)
- After another second or two, the display will show the Front Brake Symbol; you are now in the Service Menu
- Use the BC Button (on indicator stalk) to scroll through to the relevant symbol - eg Rear Brakes
- To Reset the warning indicator alarm, Press & Hold the BC Button at the relevant symbol until RESET appears - then press and hold again until the process is complete
- Turn Off and On the Ignition again - Warning should now have gone!
If the above didn't work, try:
- Sit in car, close door and turn ignition on
- Press and hold trip reset button for 10 seconds
- The upper display in the tach will be illuminated with a service warning item. the lower display in the tach will indicate the remaining time or mileage left for that service item. Pressing the BC (board computer) button repeatedly on the end of the turn signal stalk will allow the display to scroll through all of the condition based service items
- To reset, press and hold the bc button again and the lower screen will indicate reset
- Pressing the BC button only resets the item displayed in the upper window only. Repeat the procedure for any additional service reset needs.
Customer reported the following:
On an R55 I struggled to get the sequence right to access the menu. Found a random post which specified that before attempting you have to use the BC button to move the tach display into clock. Once time is shown, long-pressing the trip/reset will enter the service menu. Once I found this I was able to access following the same:
- Press BC to display clock
- Long press trip
- Menu accessed
- BC button to cycle/reset as needed
Thank you Rick M!
Reset for Generation 3 ("Gen3") MINI Cooper:
- 2014+ F56 Hardtop/Hatchback MINI Cooper
- 2015+ F55 Hardtop/Hatchback MINI Cooper
- 2016+ F57 Convertible MINI Cooper
- 2017+ F60 Countryman MINI Cooper
For more information about resetting your Brake Sensor on your Gen3 MINI Coopers, you might want to review this article: How To Reset Your F-Series Brake Sensor.
- Press start button to first stage of ignition (do not start engine)
- Wait for red brake sensor warning to disappear
- Press odometer and hold (about 15 - 20 seconds) - you now have the "reset" menu
- Now press and hold to get to brake light
- Then press and hold again to reset
Customer comment from Mark W:
If every time it comes up with "reset unsuccessful," do the process with the electronic parking brake off. If it doesn't work, then reset the odometer to zero and try again.