Watch: DIY MINI Xenon Headlight Bulb Replacement
In this video we replace a blown D1S Xenon bulb on our 2007 R56 MINI Cooper S hatchback/hardtop...
Shop Repair & Replacement Lighting for Your MINI
Subscribe to Our YouTube Channel
|
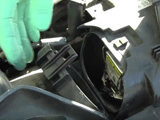
TRANSCRIPTION Alright, so what we're going to do is it is our right front that's out, by the way if you're thinking you just touch the left front headlight no I didn't, I touched the right front headlight with my left hand. Remember, left and right on a car is as you're sitting behind the wheel of the car so if you're sitting behind the wheel of a car this is your right front so we're going to change the right front. 0 Now here comes the tricky part, somebody who's done this in the past may have felt like they had to remove the entire thing in order to get the bulb out of the back. It's a tight fit that you can do it without removing it, you're just going to have to bring it out and you're going to have to twist it and you're going to have to be mindful of your electrical lead that goes to it so you can do it without removing it. Look inside to make sure once you've got everything cleared and again you have to steer it around both of the clips. But as you can, you can get it out without removing your entire housing and you don't want to do that. That's just too much work to replace one mold so check your orientation. Before you actually remove your bulb get your replacement, make sure that the orientation is the same, so we're just going to take that off. The new one is going to be clipped right in and then installation is just a reversal of the removal process. Be very careful to twist it and get it in there, and then once you've got it in again you need to sort of remove your clips around your securing clips give it a twist to make sure it's seated. Once it's seated, you just put your clips back in there's one there's two. I've got your cover, snap your cover back on, power and that's all there is to it. We're going to try to do a lot more of these “quick and dirty” videos for doing the little things that can sometimes be a chore if you've never seen it or done it yourself. So check back and we will do some more videos for you guys. |