

|
Total posts: 1368
Last post: Jul 20, 2023 Member since:Jul 15, 2008
|
Cars in Garage: 0
Photos: 117 WorkBench Posts: 1 |
|
|
|
Total posts: 8382
Last post: Jan 13, 2022 Member since:Feb 7, 2006
|
Cars in Garage: 0
Photos: 0 WorkBench Posts: 0 |
|
If in doubt, flat out. Colin Mc Rae MBE 1968-2007.
Give a car more power and it goes faster on the straights,
make a car lighter and it's faster everywhere. Colin Chapman.
|
|
Total posts: 1368
Last post: Jul 20, 2023 Member since:Jul 15, 2008
|
Cars in Garage: 0
Photos: 117 WorkBench Posts: 1 |
|
|
|
Total posts: 63
Last post: Jul 12, 2017 Member since:Sep 1, 2014
|
Cars in Garage: 0
Photos: 0 WorkBench Posts: 0 |
|
|
Total posts: 662
Last post: Apr 17, 2024 Member since:May 18, 2002
|
Cars in Garage: 0
Photos: 0 WorkBench Posts: 0 |
|
Minisport Alloy Hubs
KAD Alloy hubs
I have a set of the KAD hubs. I spent a bunch of time getting the shimmed original style ball joints perfect and they lasted 1000 or so miles because the quality of the heat treatment was crap. Screw a set of sealed ball joints on the KAD or Mini Sport hubs and you're done.
Not period correct but way easier for better longevity.
|
|
Total posts: 9540
Last post: Apr 18, 2024 Member since:Aug 14, 2002
|
Cars in Garage: 0
Photos: 0 WorkBench Posts: 0 |
|
.....
*if during the cleanout process you notice a step or pronounced groove in any of the parts, then yea, you may as well replace them.
.
"Hang on a minute lads....I've got a great idea."
|
|
Total posts: 8382
Last post: Jan 13, 2022 Member since:Feb 7, 2006
|
Cars in Garage: 0
Photos: 0 WorkBench Posts: 0 |
|
X 2 what Spank said check the torque of them before you take them apart and buy extra shims so you have enough on hand when re shimming them.
If in doubt, flat out. Colin Mc Rae MBE 1968-2007.
Give a car more power and it goes faster on the straights,
make a car lighter and it's faster everywhere. Colin Chapman.
|
|
Total posts: 6349
Last post: Oct 22, 2023 Member since:Mar 9, 1999
|
Cars in Garage: 0
Photos: 0 WorkBench Posts: 0 |
|
I recall about 10-15 years ago, I would lap in every balljoint, spending hours trying to get it just right. The result: Nearly the same as when I didn't lap them: Removing a shim (granted, a thinner one on the ones I lapped) after a few thousand miles.
The balljoints have gotten crappier since then. I can't remember when I've seen a new one in recent times with anywhere near the heat treatment witness bluing of the ones from just 5 years ago.
I put them in tighter, now, and don't lap them. I treat them like an old-skool head gasket or wheelbearing job: retorque after a prescribed time.
If you've got $ and time to throw at it, go ahead and get new ones.
The smart use of time and $ is to open it up, clean it out*, remove a shim, re-torque using the proper deep socket. and repeat until there is no play.
You can look at it this way: The last few thousand miles of driving have been lapping it in for you.
*if during the cleanout process you notice a step or pronounced groove in any of the parts, then yea, you may as well replace them.
|
|
Total posts: 9540
Last post: Apr 18, 2024 Member since:Aug 14, 2002
|
Cars in Garage: 0
Photos: 0 WorkBench Posts: 0 |
|
Michael:
Ball joints can be replaced without disassembling the hub. Do them one at a time.
Lapping the "ball" of the joint is what they/we are referring to. It makes the ball more spherical, smooth and fitting the inside of the dome properly. Normal use will also do this, but it will leave the joint loose and needing adjustment. But not as loose as your video shows.
Getting the shimming right is also important. Save the old shims in case you need them, but use the new shims first, and save what you don't use.
You may find that a ball joint is too loose even with no shims installed. (I had 1 of 4 from the same source with this problem.) To remedy, you need to lap down the bottom of the dome nut until you get the right fit. If you don't have a machine shop, you can use emery cloth or paper on a very flat surface - a piece of plate glass is ideal - and rib the nut on it until you sand it down to spec. Don't try filing or grinding - you will end up with the surface not perpendicular to the axis of the threaded part and it won't torque properly.
.
"Hang on a minute lads....I've got a great idea."
|
|
Total posts: 1368
Last post: Jul 20, 2023 Member since:Jul 15, 2008
|
Cars in Garage: 0
Photos: 117 WorkBench Posts: 1 |
|
|
|
Total posts: 654
Last post: Dec 20, 2017 Member since:Sep 24, 2011
|
Cars in Garage: 0
Photos: 0 WorkBench Posts: 0 |
|
|
|
Total posts: 1368
Last post: Jul 20, 2023 Member since:Jul 15, 2008
|
Cars in Garage: 0
Photos: 117 WorkBench Posts: 1 |
|
|
|
Total posts: 9241
Last post: Aug 17, 2023 Member since:Jun 5, 2000
|
Cars in Garage: 0
Photos: 0 WorkBench Posts: 0 |
|
While it is possible to replace the ball joints on the car I would not suggest trying it. When you tighten the ball joints it requires (from memory) 80 ft-lb. While that's possible... the hub assembly is going to want to twist and bobble around while you apply the torque. Keep in mind you won't be applying the torque just once, you will be doing it over and over again as you check the fit of the shims.
Google for threads on lapping ball joints. Follow the steps described to make sure the ball joint parts are properly seated to each other PRIOR to determining the shim count.
As Ian said, you don't need the special tool. However, something that will prove handy is making something to bolt the hub to so you can clamp it in your bench vise. The hub casting is a unique shape that is hard to hold directly in a vise. As I mentioned above about not doing this on the car, the hub may flop around while torquing the ball joint dome nuts if you don't have a way to keep it from slipping in the vise.
|
|
Total posts: 1716
Last post: Oct 18, 2020 Member since:Oct 18, 2011
|
Cars in Garage: 0
Photos: 0 WorkBench Posts: 0 |
While Rosebud was on the dyno at MM’s Open House last Saturday (more on that later), the dyno technician said that Rosebud’s balljoints needed replacement. He was able to move the swivel hub up & down about ¼” on both sides of the car. So, before I begin, I have a couple of questions.
Methinks there's something fishy in the State of Denmark..... I wouldn't think it possible that the hub could move this much while the balljoints remain connected..Are the top and bottom nuts that secure the ball joint pin to the suspension arms still in place?? Are the domed nuts that hold the joint to the uprights still in place???? I would think that with that much movement the domed nuts would be almost completely detached from the uprights ..
1) The balljoints were new less then 4k gentle miles ago. Seems a little premature for that much wear. Yes?
I don't believe that much wear is possible.....
2) Haynes says the swivel hubs need to be removed in order to replace the balljoints. Is this correct? Looks to me like I can replace the balljoints w/o removing the hubs. Wishful thinking?
Are we talking about the same things??? Remove the ball joint and the hub is no longer attached to the car ..well held on only be the inner joint boot strap.... and the steering arm..
3) If the hubs need to be removed, is that very difficult and are there any tips for separating the driveshafts from the hubs? I assume only the outboard (hub) side of the driveshafts need be removed and the diff side can stay in place. Correct?
Once you remove the hub nut the upright will just slide off the CV splines.... On the other hand ...IMHO its probably easier to undo the inner boot strap and slide the hub out with the drive shafts attached (no need to undo hub nut... Although...its been a while... just maybe the large part of the inner CV (if that's what you have) mightn't fit through the hole in the subframe????
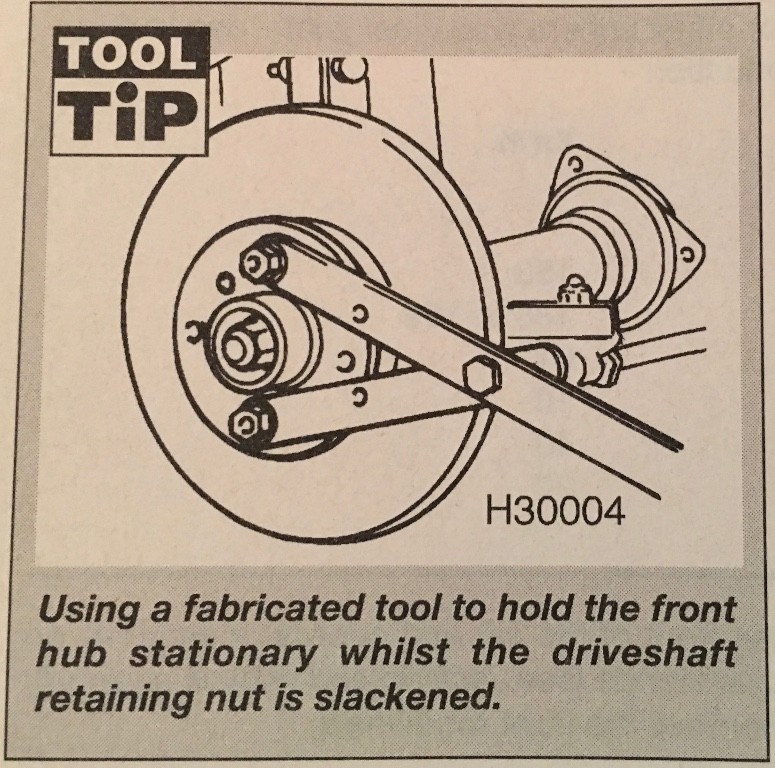
4) Do I really need to make one of these (see pic) in order to remove the driveshaft retaining nut? Seems like having an assistant step on the brake would prevent the hub from turning better than this gizmo.
No (no need for the gizm ... an assistant on the brake pedal is fine .. or even a large pry bar threaded through wheel studs with one end propped on the ground ....
6) Anything else have to come off? Tie rods, steering arms?
Detach steering at the arm ball joint.., tie rod is attached to lower arm so stays in place..
Any help would be appreciated.
I'd be putting the car on stands and having the able assistant lift the hubs to check exactly what is moving before I started on anything...
Cheers, Ian
|
|
Total posts: 1404
Last post: Jun 21, 2018 Member since:Oct 8, 2013
|
Cars in Garage: 0
Photos: 0 WorkBench Posts: 0 |
No they shouldn't have worn out that quick unless they were those cheap chinese things, or they wern't shimmed correctly in the first instance?
Mini's are like buses they come along in a bunch
|
|
Total posts: 1368
Last post: Jul 20, 2023 Member since:Jul 15, 2008
|
Cars in Garage: 0
Photos: 117 WorkBench Posts: 1 |
|
While Rosebud was on the dyno at MM’s Open House last Saturday (more on that later), the dyno technician said that Rosebud’s balljoints needed replacement. He was able to move the swivel hub up & down about ¼” on both sides of the car. So, before I begin, I have a couple of questions.
1) The balljoints were new less then 4k gentle miles ago. Seems a little premature for that much wear. Yes?
2) Haynes says the swivel hubs need to be removed in order to replace the balljoints. Is this correct? Looks to me like I can replace the balljoints w/o removing the hubs. Wishful thinking?
3) If the hubs need to be removed, is that very difficult and are there any tips for separating the driveshafts from the hubs? I assume only the outboard (hub) side of the driveshafts need be removed and the diff side can stay in place. Correct?
4) Do I really need to make one of these (see pic) in order to remove the driveshaft retaining nut? Seems like having an assistant step on the brake would prevent the hub from turning better than this gizmo.
6) Anything else have to come off? Tie rods, steering arms?
Any help would be appreciated.


