
| Orig. Posting Date | User Name | Edit Date |
| May 29, 2017 10:14AM | tmsmith | |
| May 29, 2017 09:04AM | tmsmith | |
| Mar 14, 2017 01:03PM | tmsmith | |
| Mar 14, 2017 11:47AM | dklawson | |
| Mar 14, 2017 11:25AM | 66Cooper'S | |
| Mar 14, 2017 08:39AM | dklawson | |
| Mar 14, 2017 07:49AM | tmsmith | |
| Mar 14, 2017 07:29AM | dklawson | |
| Mar 14, 2017 05:05AM | tmsmith | Edited: Mar 14, 2017 06:28AM |
| Mar 14, 2017 03:10AM | dklawson | |
| Mar 13, 2017 07:52PM | tmsmith | Edited: Mar 13, 2017 07:52PM |
| Mar 12, 2017 08:47AM | tmsmith |

|
Total posts: 3749
Last post: Mar 26, 2024 Member since:Jun 23, 2000
|
Cars in Garage: 1
Photos: 201 WorkBench Posts: 0 |
|
Image Gallery
All I have to do is switch pieces from one car to the other and I believe it will work.
|
|
Total posts: 3749
Last post: Mar 26, 2024 Member since:Jun 23, 2000
|
Cars in Garage: 1
Photos: 201 WorkBench Posts: 0 |
|
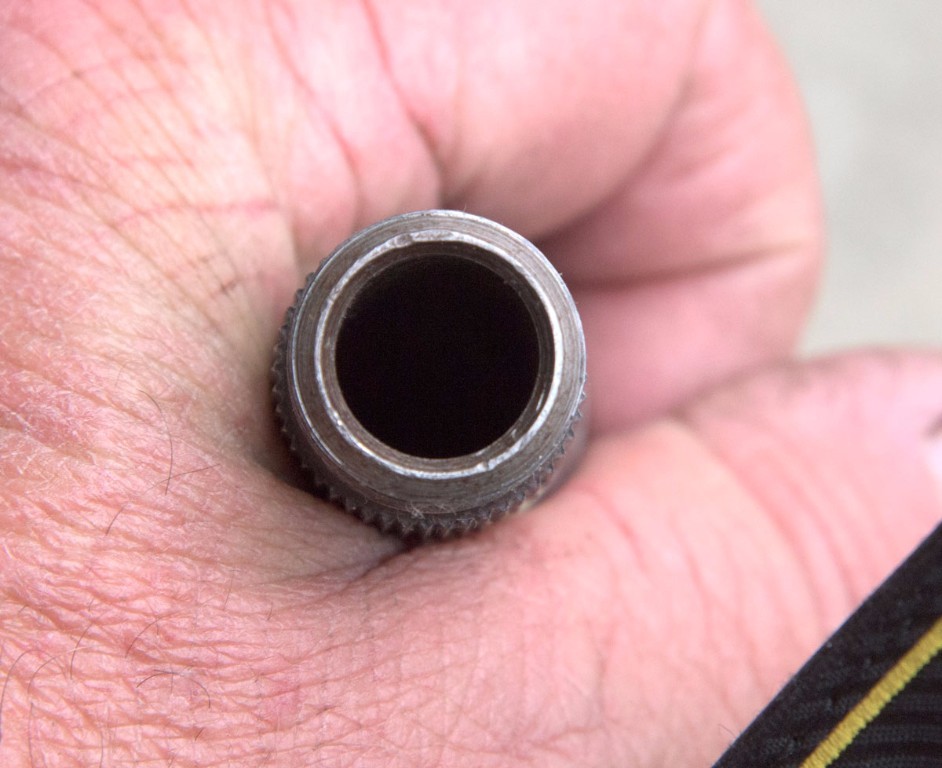
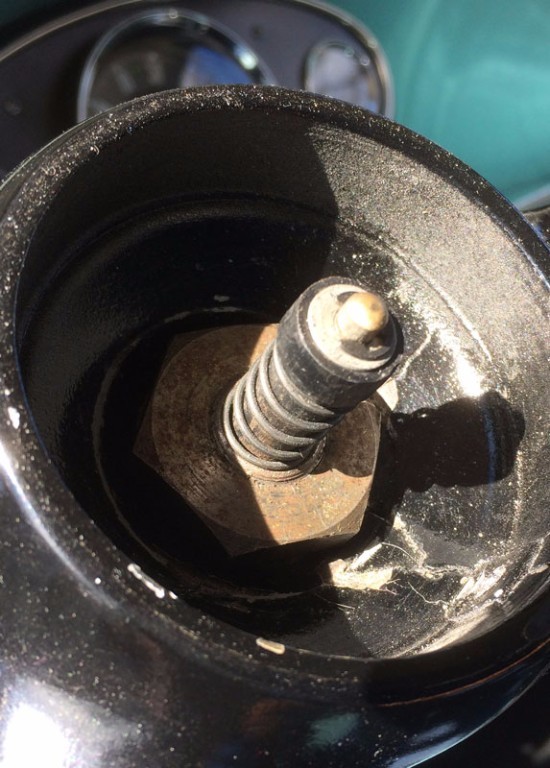
Just went back to reinstall the horn pieces and ran into a problem.
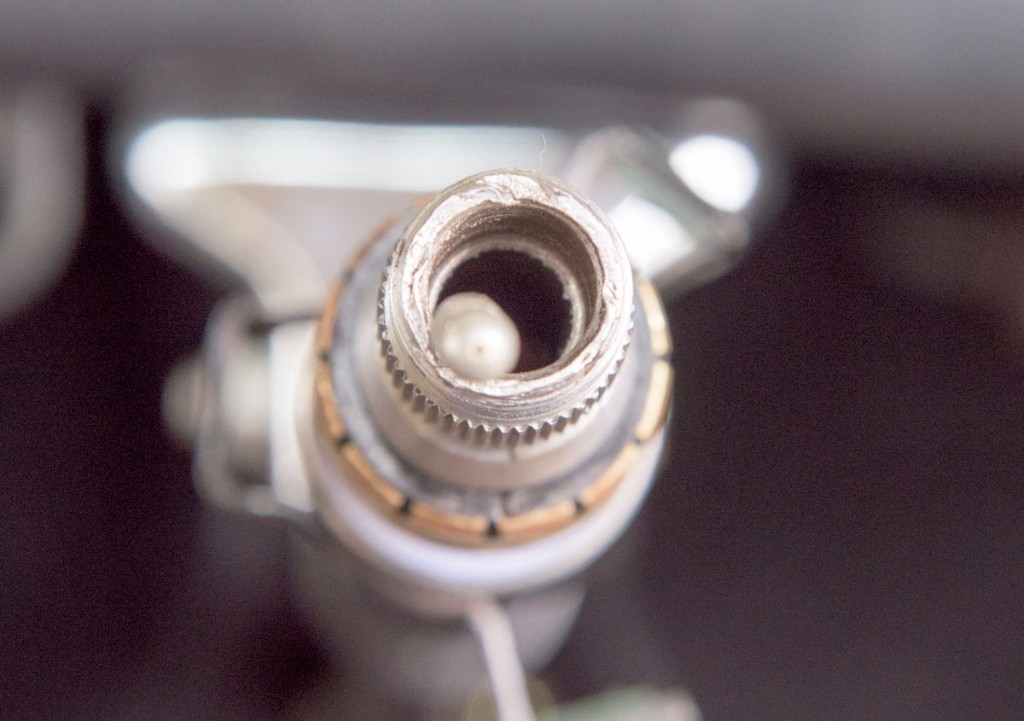
I have two different style inner of what I thought were both MK I steering columns. Both have provision for the horn, but on one, the ID is stepped and becomes smaller and the plastic insulator I just bought will not insert fully to engage the wire and locking clip.
I wonder if one is and after market replacement from a long time ago. I need to check to see if the black style insulator is any different.
|
|
Total posts: 3749
Last post: Mar 26, 2024 Member since:Jun 23, 2000
|
Cars in Garage: 1
Photos: 201 WorkBench Posts: 0 |
|
 Thanks guys.
I bit the bullet and found one on Ebay UK and paid a ridiculous sum for it.
This is for one of my wife's cars and I am putting an original wheel back on it.
The Mountney that it has now had issues with its horn and shorting out, so I did not want to take a chance.
Nothing like a horn going off in a parking lot on more than one occasion to aggravate someone.
With those dimensions, I may try one of the online printing or emachine shop places.
The picture is nylon spacers and a washer. I thought I could glue/cement them together, but they are 1/2 inch and need to be turned down to the appropriate size. Filing with the spacer in a drill did not work.
I will look at the PEX tubing though for future use.
|
|
Total posts: 9241
Last post: Aug 17, 2023 Member since:Jun 5, 2000
|
Cars in Garage: 0
Photos: 0 WorkBench Posts: 0 |
|
Brilliant John! Thanks for posting the drawing.
Based on your dimensions and assuming Terry does not have access to a lathe, it probably would be possible to use the 3/8" PEX faucet riser tube or a 3/8" tubing plastic hose barb to make an improvised sleeve.
Based on your dimensions and assuming Terry does not have access to a lathe, it probably would be possible to use the 3/8" PEX faucet riser tube or a 3/8" tubing plastic hose barb to make an improvised sleeve.
Doug L.
|
|
Total posts: 3523
Last post: Jul 9, 2023 Member since:Feb 26, 1999
|
Cars in Garage: 0
Photos: 0 WorkBench Posts: 0 |
|
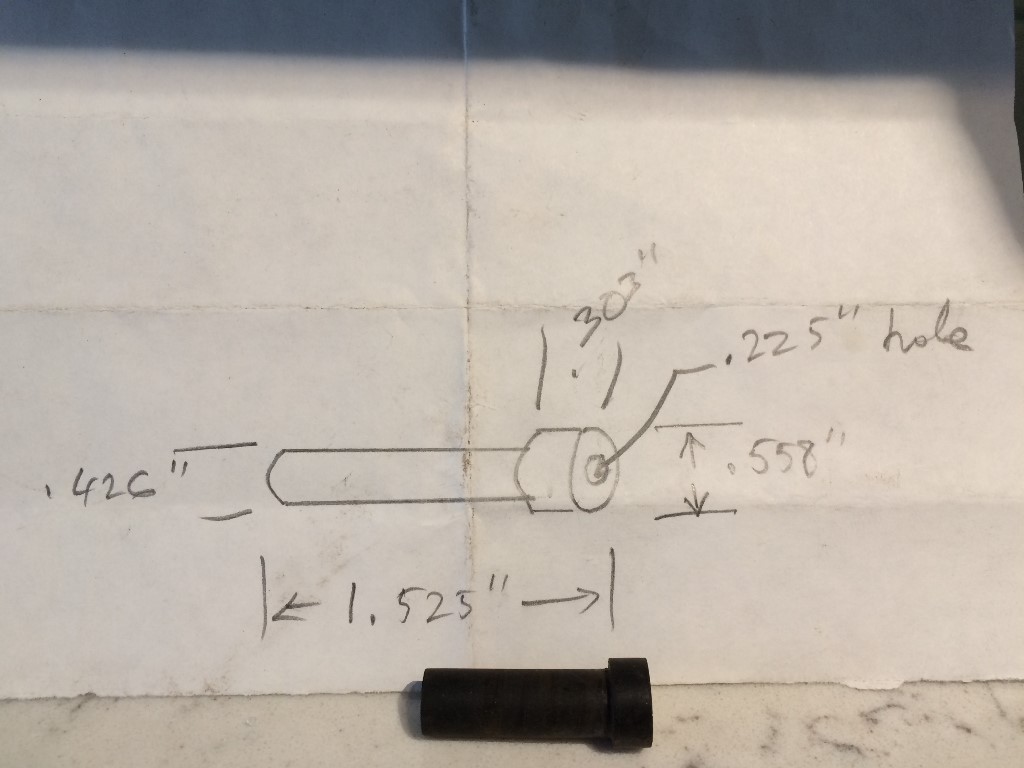 Terry possibly the picture will help
John C.
|
|
Total posts: 9241
Last post: Aug 17, 2023 Member since:Jun 5, 2000
|
Cars in Garage: 0
Photos: 0 WorkBench Posts: 0 |
|
If you have an Ace hardware or similar available, they often have the bin/drawers with miscellaneous hardware. You might check there for nylon standoffs (threaded or tubular) that you could use the same as the tubing and pen body I mentioned earlier. If the steering column hole measures at least 3/8" in diameter you could try a PEX faucet riser tube. Branching out from there, look at the plastic barbed tubing connectors used for vinyl tubing. You should find some on the plumbing aisle and some in the garden center for irrigation systems. If you don't see something suitable there, try Advance Auto or AutoZone to see what they have in the way of plastic barbed fittings.
Make sure you know the inside diameter of the steering column before you go hunting and I'm sure you will find something to improvise with.
Make sure you know the inside diameter of the steering column before you go hunting and I'm sure you will find something to improvise with.
Doug L.
|
|
Total posts: 3749
Last post: Mar 26, 2024 Member since:Jun 23, 2000
|
Cars in Garage: 1
Photos: 201 WorkBench Posts: 0 |
|
I spent some time wandering the hardware store yesterday, looking for improvisational parts
I will take another look...
I will take another look...
|
|
Total posts: 9241
Last post: Aug 17, 2023 Member since:Jun 5, 2000
|
Cars in Garage: 0
Photos: 0 WorkBench Posts: 0 |
|
If you are OK with improvising and don't want to machine the part consider the following.
Find a plastic ball point pen whose body is just slightly smaller in diameter than the hole in the steering column. Cut that to the approximate length of the plastic sleeve shown in the pictures. Visit the hardware store and find an E-clip or (preferably) snap ring that is a snug fit to the OD of the pen body. Place that ring on the cut off pen body about 1/8" to 3/16" down from the end. Use a soldering iron to gently heat the ring until you see it start to sink into the pen body (work your way around the ring so the "sinking in" is uniform in depth). Stop when the ring has made an indent all the way around. Match that part with the right size flat washer and snap ring for the bullet connector and all you need to do is find a spring that will just clear the pen body. There is nothing magic about the spring, it just needs to fit the OD of the plastic sleeve and push the bullet connector against the back of the horn button.
If you don't like using the pen body, visit the plumbing department at Lowes or Home Depot. Look for plastic tubing. They should have 1/4" and 5/16" OD material, probably in polyethylene but they may also have nylon. Buy nylon tubing if they have it. One of those two sizes will probably fit well enough and you only need a small piece of each to experiment with.
Doug L.
|
|
Total posts: 3749
Last post: Mar 26, 2024 Member since:Jun 23, 2000
|
Cars in Garage: 1
Photos: 201 WorkBench Posts: 0 |
|
I still have the slip ring pieces. Actually it may be a 3D print job, but I do not have the skills to draw the wire frames.
I thought I could glue nylon spacers and a washer together to recreate the insulator, but that does not seem to be working either.
Terry
Actually the picture is from a post on this site from 2014
I thought I could glue nylon spacers and a washer together to recreate the insulator, but that does not seem to be working either.
Terry
Actually the picture is from a post on this site from 2014
|
|
Total posts: 9241
Last post: Aug 17, 2023 Member since:Jun 5, 2000
|
Cars in Garage: 0
Photos: 0 WorkBench Posts: 0 |
|
Perhaps someone on the Mk1 board will remember who on eBay was selling the shaft center insulator. If not, I'm sure you could re-create the necessary parts from scratch if you had to by scaling the pictures and measuring the steering column. The nearly impossible task would be making the black plastic parts that go under the slip ring. Hopefully you still have those.
Doug L.
|
|
Total posts: 3749
Last post: Mar 26, 2024 Member since:Jun 23, 2000
|
Cars in Garage: 1
Photos: 201 WorkBench Posts: 0 |
|
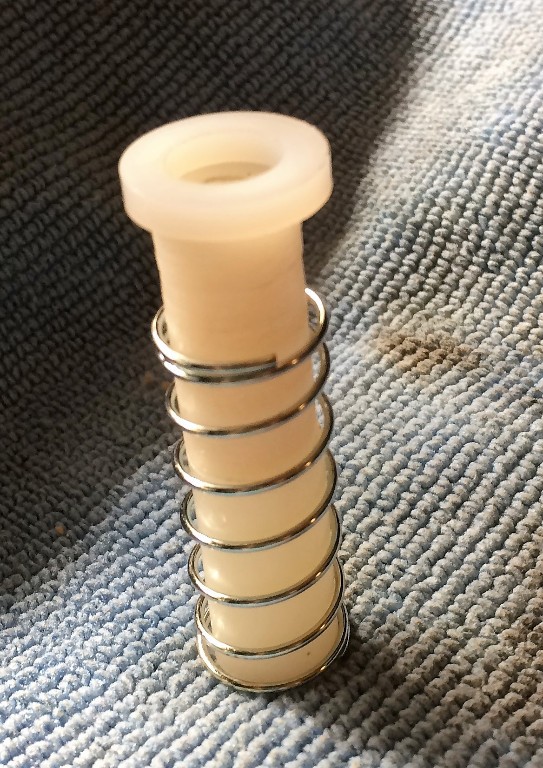
 Some one was remaking the insulator piece a few months ago. This is from a post abut 6 months ago. Unfortunately the seller is not visible.
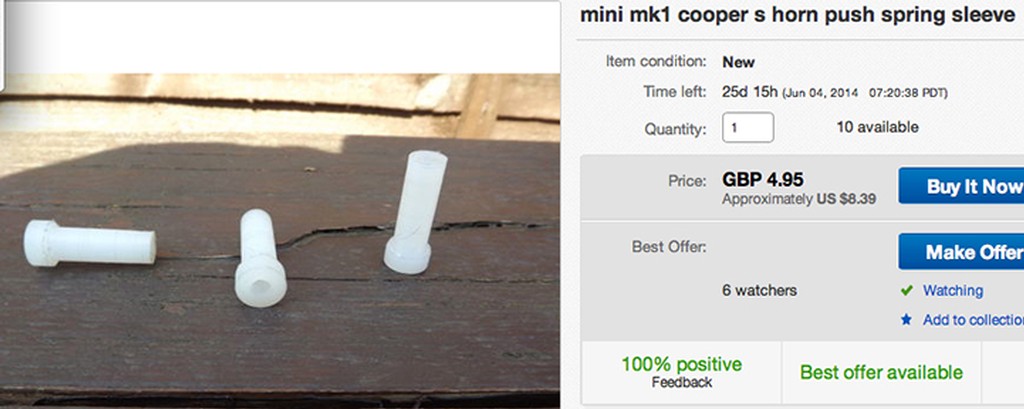
|
|
Total posts: 3749
Last post: Mar 26, 2024 Member since:Jun 23, 2000
|
Cars in Garage: 1
Photos: 201 WorkBench Posts: 0 |
|
Image Gallery
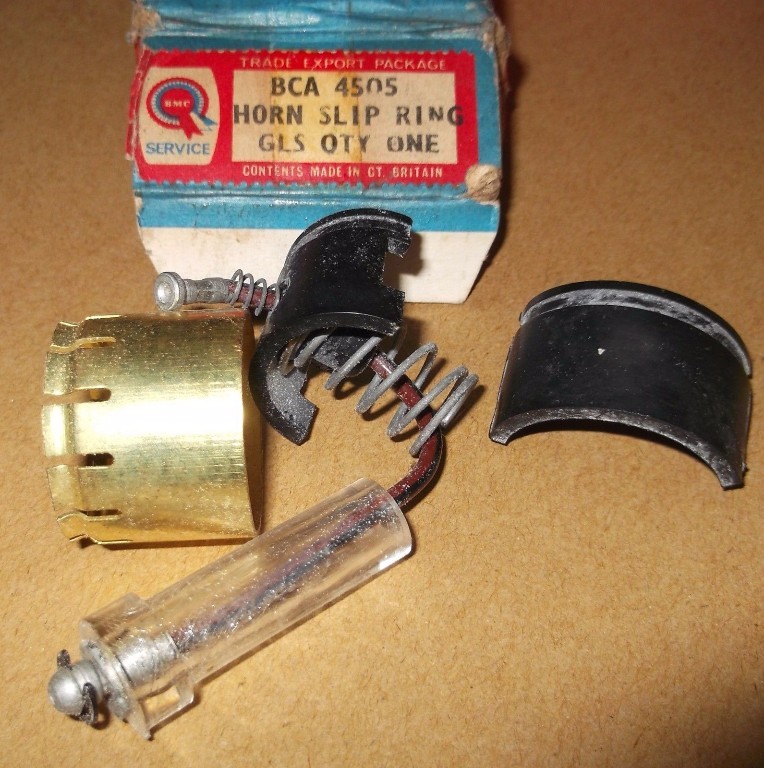
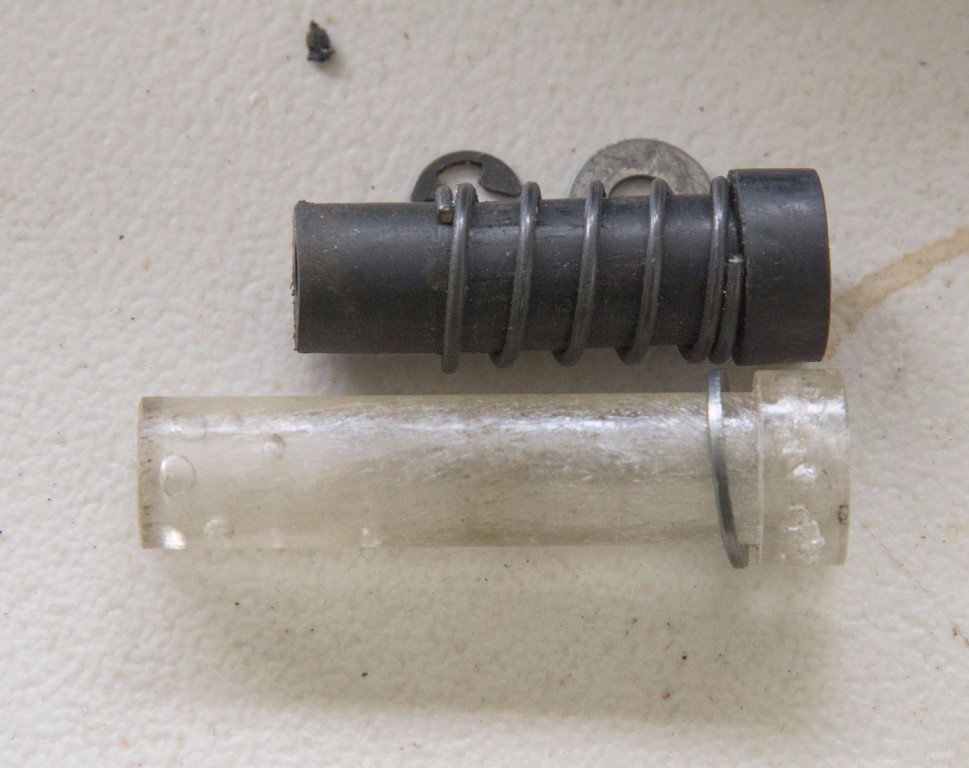
One picture is the complete kit from a post from a few years ago.
My parts did not look exactly like that. Instead of a clear plastic insulator I had a hard rubber version like the second picture.
I know parts are next to impossible to find as there was a discussion on the MK I forum not too long ago. It seems that the pieces from a Morris Minor can be adapted as well.
Has any one come up with alternatives? I have the slip ring and connector with wire. What I need are the insulator and spring. It should not be a problem to find the right size washer and circlip for the end.
It appears the insulator sits in the end of the column about 3/4 of an inch with a wider part of the plastic or hard rubber bit keeping the spring under tension and then held on with the washer and circlip.


