
| Orig. Posting Date | User Name | Edit Date |
| Feb 16, 2017 03:01PM | fMix | |
| Feb 15, 2017 04:25PM | malsal | |
| Feb 15, 2017 11:27AM | fMix | |
| Feb 15, 2017 06:17AM | malsal | |
| Feb 14, 2017 06:41PM | fMix | |
| Oct 3, 2016 05:53PM | fMix | Edited: Oct 4, 2016 02:23PM |

|
Total posts: 169
Last post: Sep 18, 2020 Member since:Jan 28, 2014
|
Cars in Garage: 0
Photos: 0 WorkBench Posts: 0 |
I wish I had thought of that sooner. Would have saved me some time and hassle. But at least I get to say I made my own brackets.
|
|
Total posts: 8382
Last post: Jan 13, 2022 Member since:Feb 7, 2006
|
Cars in Garage: 0
Photos: 0 WorkBench Posts: 0 |
|
Use the factory brackets they are solid and cheap enough at all the major Mini suppliers and if you need to adjust them slightly to fit your lights put a stainless flat washer under them until they are adjusted correctly then "tweak" them a little if you have to.
If in doubt, flat out. Colin Mc Rae MBE 1968-2007.
Give a car more power and it goes faster on the straights,
make a car lighter and it's faster everywhere. Colin Chapman.
|
|
Total posts: 169
Last post: Sep 18, 2020 Member since:Jan 28, 2014
|
Cars in Garage: 0
Photos: 0 WorkBench Posts: 0 |
I noticed that when looking at the Wipac lights. Unfortunately the housings I bought are not adjustable for up/down. They are designed to be set level on a Harley. I guess it isn't all bad though, since I will never need to adjust them again if they are removed for some reason.
|
|
Total posts: 8382
Last post: Jan 13, 2022 Member since:Feb 7, 2006
|
Cars in Garage: 0
Photos: 0 WorkBench Posts: 0 |
|
Even if you use the late model Rover fog/spot light brackets they are not adjustable it is the lamp itself that adjusts.
If in doubt, flat out. Colin Mc Rae MBE 1968-2007.
Give a car more power and it goes faster on the straights,
make a car lighter and it's faster everywhere. Colin Chapman.
|
|
Total posts: 169
Last post: Sep 18, 2020 Member since:Jan 28, 2014
|
Cars in Garage: 0
Photos: 0 WorkBench Posts: 0 |
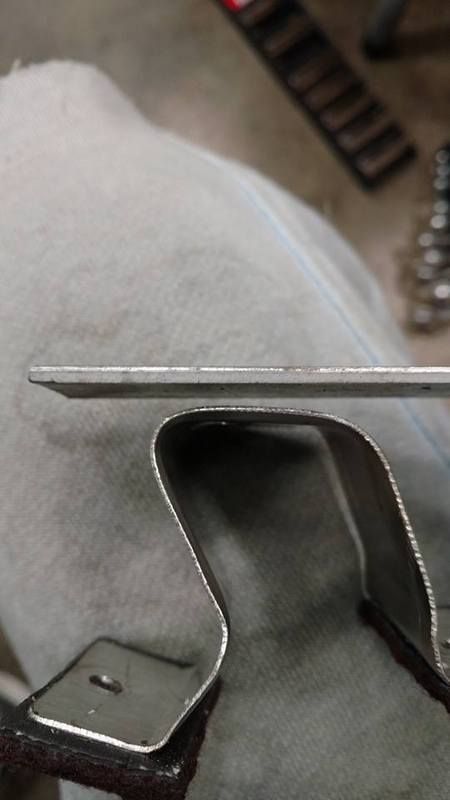
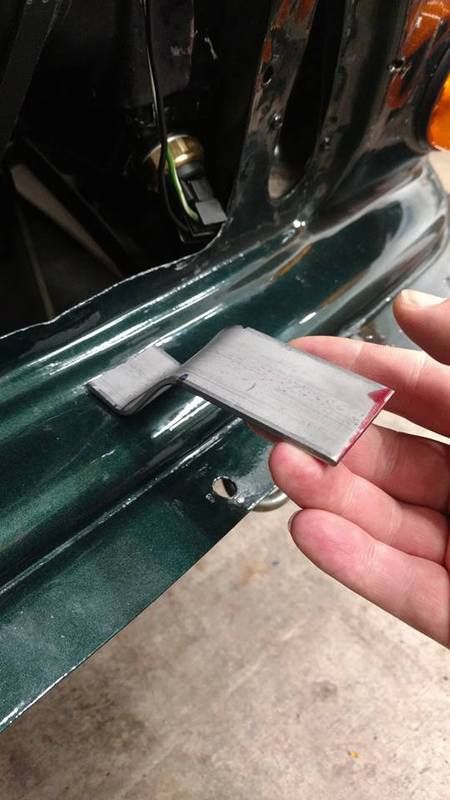
Quick update on this. The project kind of took a back seat to parenting, xmas, and family birthdays. But I got some free time to mount the light with the thin stainless in the front. The light was so bouncy it looked like a strobe on the freeway over pass signs. Back to the drawing board, I cut and bent the front piece from the same 1/8th inch steel and tested it. Nice an solid, no bounce. I sanded the one test piece I have and will need to bend and fit the 2nd one. Then paint them and finalize the wire harness.
For the wiring, my Mini has a manual fan switch wired in to the electric radiator fan because the sensor didn't work. When I bought the car I replaced the radiator and haven't seen it get passed half way on the temp gauge even through the heat waves of last summer. So I unplugged the power wire from that circuit and have run it to the front for the fog lights. And the good thing is that if incase I do encounter overheating I can simply unplug the fogs and plug in the electric fan to help cool the engine.
After being able to drive the Mini at night for an hour with one light on I can definitely say I like the LED's I have chosen. The lighting to the side is amazing. I just wish the housings I bought were adjustable for up/down. My brackets are only adjustable by sticking them in the vice and bending them. I keep going back and fourth between just getting proper fogs and brackets or not. My housings are very deep and look a little funny from above or the side, but to the untrained passerby they wouldn't notice the issue.
For the wiring, my Mini has a manual fan switch wired in to the electric radiator fan because the sensor didn't work. When I bought the car I replaced the radiator and haven't seen it get passed half way on the temp gauge even through the heat waves of last summer. So I unplugged the power wire from that circuit and have run it to the front for the fog lights. And the good thing is that if incase I do encounter overheating I can simply unplug the fogs and plug in the electric fan to help cool the engine.
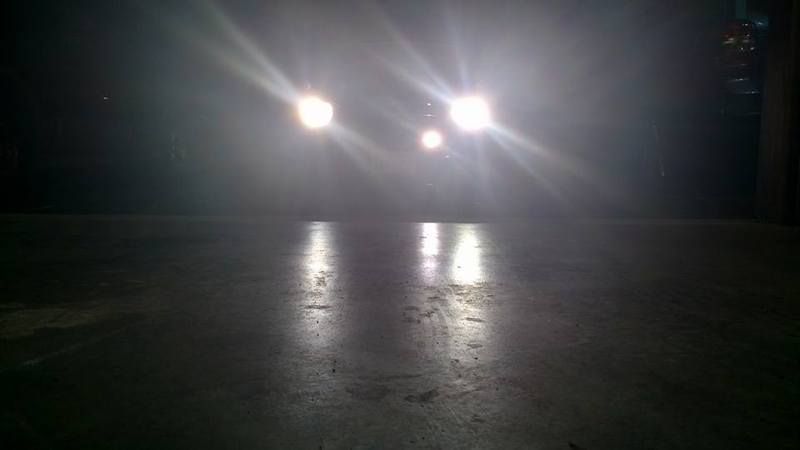
After being able to drive the Mini at night for an hour with one light on I can definitely say I like the LED's I have chosen. The lighting to the side is amazing. I just wish the housings I bought were adjustable for up/down. My brackets are only adjustable by sticking them in the vice and bending them. I keep going back and fourth between just getting proper fogs and brackets or not. My housings are very deep and look a little funny from above or the side, but to the untrained passerby they wouldn't notice the issue.
|
|
Total posts: 169
Last post: Sep 18, 2020 Member since:Jan 28, 2014
|
Cars in Garage: 0
Photos: 0 WorkBench Posts: 0 |
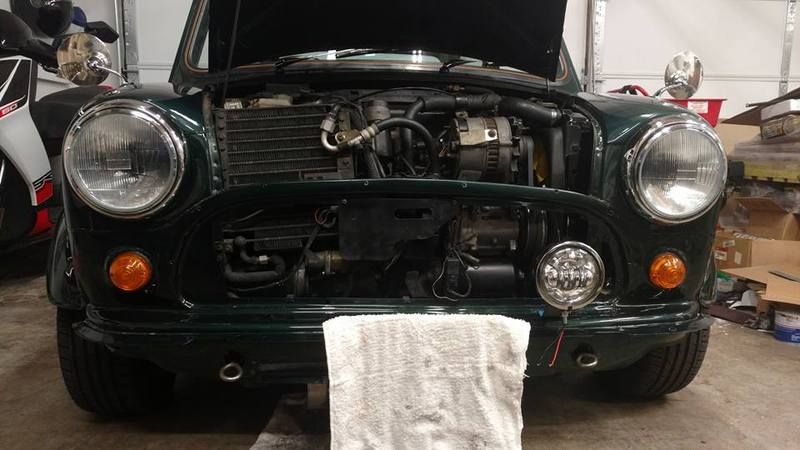
Hey guys, I haven't found any DIY's with pictures for fog light install so I decided to start my own. The OEM fogs look pretty straight forward, but I decided to go a different route. My only issue is going to be finding a power wire I want to use to light them. I know I will want them to turn on with the headlights, probably when the DRL's are turned on. But I also may want to have them on a switch to be able to turn them off for whatever reason. Since I want to make the rear fog light a 3rd brake light for added safety, I will probably use the rear fog switch as the toggle and run the wires out to the lights. The rear fog is switched to the headlights already so that saves some work. I've read that there may already be wires run and tucked but I haven't seen any photos of where they might be or what they look like. That would probably make it the easiest if I could find them.
To start, I got a gift card from work so I bought a set of these with the chrome color so they would match the OEM style. They are 4.5" motorcycle passing lights.
https://www.amazon.com/gp/product/B01B3774LG/ref=oh_aui_detailpage_o01_s00?ie=UTF8&psc=1
Bench tested them on a tree stump and aimed at the end of the yard to the fence about 100ft away. Just one was just pretty good, but with both turned on an in the approximate Mini mount location there was a nice bit of overlap and they look great. The cutoff is excellent and I know I won't be blinding anyone. There is a great spread left to right of light and the over lap will cover a great area in front of the car.
I didn't know these are designed to be installed inside a housing, so I went to the local motorcycle scrap yard and bought a set of housings that fit the round classic style of the Mini.
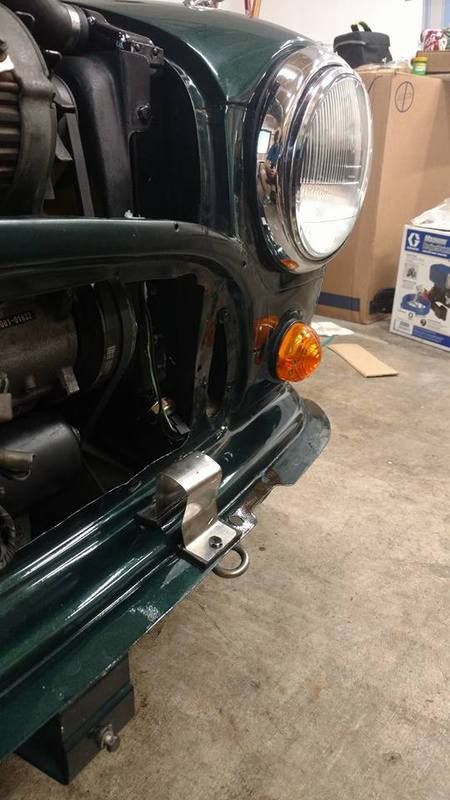
I started off making a bracket to go to both fog mount holes but my skills (and patience) aren't crafty enough to bend up what I needed. So I went out and bought a 3ft bar of 1.5" wide 1/8th inch steel. I cut out the half of the bracket I need to mount behind the grill and bent them up to fit and mount the lights. Drilled holes and I'm done. After mounting, I tested the passenger side and bent to give the correct height adjustment. Through this week I will work on the driver's side.
The brackets are a little bouncy because the body work I am mounting to is pretty thin. I will probably bend up a bit of the stainless I've been using and make a forward support to go behind the bumper and mount to the light to keep them from bouncing and bending the bolt holes. After I'm done with the fab work and ready to install I will sand the brackets and paint them a flat black color.
To start, I got a gift card from work so I bought a set of these with the chrome color so they would match the OEM style. They are 4.5" motorcycle passing lights.
https://www.amazon.com/gp/product/B01B3774LG/ref=oh_aui_detailpage_o01_s00?ie=UTF8&psc=1
Bench tested them on a tree stump and aimed at the end of the yard to the fence about 100ft away. Just one was just pretty good, but with both turned on an in the approximate Mini mount location there was a nice bit of overlap and they look great. The cutoff is excellent and I know I won't be blinding anyone. There is a great spread left to right of light and the over lap will cover a great area in front of the car.
I didn't know these are designed to be installed inside a housing, so I went to the local motorcycle scrap yard and bought a set of housings that fit the round classic style of the Mini.


I started off making a bracket to go to both fog mount holes but my skills (and patience) aren't crafty enough to bend up what I needed. So I went out and bought a 3ft bar of 1.5" wide 1/8th inch steel. I cut out the half of the bracket I need to mount behind the grill and bent them up to fit and mount the lights. Drilled holes and I'm done. After mounting, I tested the passenger side and bent to give the correct height adjustment. Through this week I will work on the driver's side.

The brackets are a little bouncy because the body work I am mounting to is pretty thin. I will probably bend up a bit of the stainless I've been using and make a forward support to go behind the bumper and mount to the light to keep them from bouncing and bending the bolt holes. After I'm done with the fab work and ready to install I will sand the brackets and paint them a flat black color.


