
| Orig. Posting Date | User Name | Edit Date |
| Oct 12, 2017 12:43PM | BugeyeandMini | Edited: Oct 12, 2017 12:45PM |
| Dec 18, 2014 02:00PM | DRMINI | Edited: Dec 29, 2014 09:30PM |
| Dec 18, 2014 01:54PM | DRMINI | |
| Dec 18, 2014 01:40PM | mur | |
| Dec 18, 2014 01:22PM | DRMINI | |
| Dec 18, 2014 08:13AM | charrison | |
| Dec 18, 2014 05:54AM | CooperTune | |
| Dec 18, 2014 03:57AM | Alex | |
| Dec 17, 2014 11:49PM | DRMINI | |
| Dec 17, 2014 08:06PM | mehinger | |
| Dec 17, 2014 04:46PM | dklawson | |
| Dec 17, 2014 01:36PM | DRMINI | Edited: Dec 18, 2014 03:17AM |
| Dec 17, 2014 12:44PM | Jemal | |
| Dec 17, 2014 12:19PM | Air2air | |
| Dec 17, 2014 12:19PM | dogscarf | |
| Dec 17, 2014 12:12PM | Jemal | |
| Dec 17, 2014 11:28AM | mascherk | |
| Dec 17, 2014 11:16AM | mur | |
| Dec 17, 2014 11:12AM | Spitz | Edited: Dec 17, 2014 11:13AM |
| Dec 17, 2014 10:56AM | dogscarf | Edited: Dec 17, 2014 11:03AM |

|
Total posts: 66
Last post: Oct 12, 2017 Member since:Mar 6, 2012
|
Cars in Garage: 6
Photos: 8 WorkBench Posts: 0 |
|
You need three items.
A 7/8" socket
A good hammer
and a can of MG Chemicals Super Cold 134 spray (eBay, Amazon, etc)
Spay just the idler gear, not the case, with the super cold so it contracts. Place the 7/8" socket on the inside of the case up against the idler gear.
Give the socket a couple of good wacks with the hammer and she will pop right out. From start to finish less than a minute.
|
|
Total posts: 8645
Last post: Dec 16, 2020 Member since:Oct 27, 2000
|
Cars in Garage: 0
Photos: 0 WorkBench Posts: 0 |
|
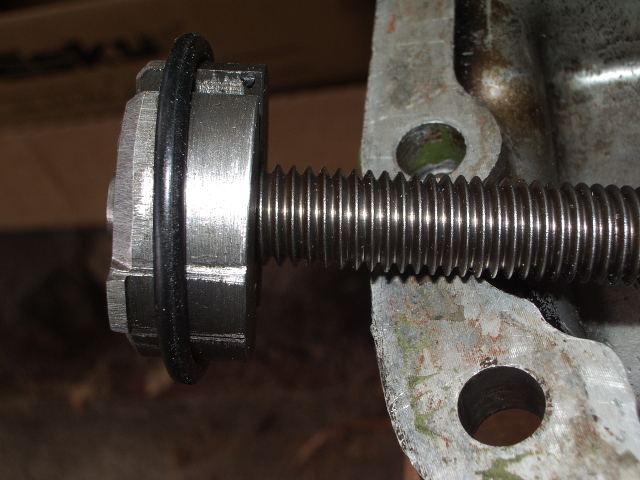
I'm on a roll, so here are details of my puller for the outrigger bearing ring:
NOTE: Dimensions shown suit the A series 4 synchro flywheel housing, with the LATEST size RHP bearing outer ring, (34mm bore).
Earlier bearings (now NLA) were smaller ID (33.37mm bore).
This puller won't fit 3 synchro cases (but I'm making one for that at the moment).
Material- 1045 or better.
Turn collets in 1 piece, body diameter 34.0mm x 13mm long.
Shoulder turn 36mm diameter x 2.2mm long.
Drill & tap right through, M12 x 1.75
Split in two, with a 5mm gap. I used a 5mm slot drill in the mill.
Mill 2 lugs 7mm wide on the flange. Cut away the rest of the flange, I used the bench grinder.
Put a 2.5mm x 45deg chamfer all round, between the 2 lugs. I used the bench grinder. (it's only for clearance)
To use, drop the collets into the bearing, check they are level with each other and the 2 lugs are in the slots, and screw the stud right in. Then drop a Mini drive yoke over it, fit washer and tighten nut. You could make up an outer body instead, but this works fine.
I warm the alloy housing to ~200C with a hot air gun to reduce drag, but these rings are not fitted real tight.
[edit] Note at top added.
Kevin G
1360 power- Morris 1300 auto block, S crank & rods, Russell Engineering RE282 sprint cam, over 125HP at crank, 86.6HP at the wheels @7000+.
|
|
Total posts: 8645
Last post: Dec 16, 2020 Member since:Oct 27, 2000
|
Cars in Garage: 0
Photos: 0 WorkBench Posts: 0 |
|
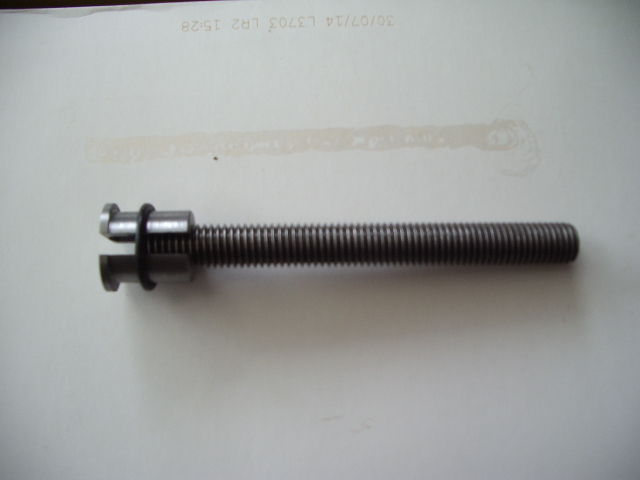
Details of my puller, for anybody who wants to make one:
Notes:
1. The O-ring shown is just to save me losing the collets when not in use.... ![]()
2. I have long ago forgotten how to draw in CAD, so here are the collet machining details:
Machine the pair in 1 piece from bar stock 1045 or better- I used a bit of 4140. No heat treatment.
Collet body diameter 0.750" (19.05mm) x 20mm long.
Flange diameter 23mm x 2mm wide. [edit] this was 24mm but I've reduced it so the tool works on top arm bearings.
Tap M12 right through.
Slot 5mm wide end to end, to make 2 collets. I used a slot drill in the mill, held in vice, did 1 side then turned it over.
Deburr edges, hold the pair of cut collets in a 4 jaw chuck and clock up the oval flange so it's concentric.
Turn the flange to 0.740" diameter, so that it will fit through the bearing.
Stud is M12 threaded rod, 120mm long.
To use, drop the collets into the bearing, check they are level with each other and screw the stud in. Then drop a Mini drive yoke over it, fit washer and tighten nut. You could make up an outer body instead, but this works fine.
I warm the alloy up a bit (200C?) with a hot air gun to reduce drag.
This tool works with both the 1" OD 3 synchro idler bearings, and the 1-1/16" OD 4 synchro ones. it is NOT for A+ housings.
[edit] It will now also remove the front suspension upper arm needle roller bearings. Use with a 1-1/16" or 27mm, 1/2" drive socket.
Kevin G
1360 power- Morris 1300 auto block, S crank & rods, Russell Engineering RE282 sprint cam, over 125HP at crank, 86.6HP at the wheels @7000+.
|
|
Total posts: 5840
Last post: Nov 1, 2019 Member since:Nov 12, 1999
|
Cars in Garage: 0
Photos: 0 WorkBench Posts: 0 |
|
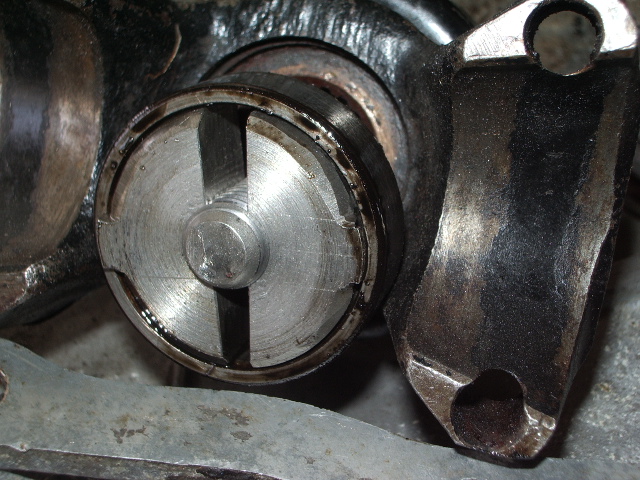
One little detail!
|
|
Total posts: 8645
Last post: Dec 16, 2020 Member since:Oct 27, 2000
|
Cars in Garage: 0
Photos: 0 WorkBench Posts: 0 |
|
Warm it up as other have said.
Carefully fill the bearing with grease, insert the end of the idler gear in the bore, as a piston and smack the free end of the idelr gear.
The intention is to use hydraulic force to push the bearing out.
This is recognised technique but you may get squirted !
Um..
There is an oil feed hole into the back of the idler bearing recess, it's not a blind hole. So I doubt it will work.
Kevin G
1360 power- Morris 1300 auto block, S crank & rods, Russell Engineering RE282 sprint cam, over 125HP at crank, 86.6HP at the wheels @7000+.
|
|
Total posts: 959
Last post: Feb 13, 2023 Member since:Sep 11, 2000
|
Cars in Garage: 0
Photos: 0 WorkBench Posts: 0 |
|
Warm it up as other have said.
Carefully fill the bearing with grease, insert the end of the idler gear in the bore, as a piston and smack the free end of the idelr gear.
The intention is to use hydraulic force to push the bearing out.
This is recognised technique but you may get squirted !
Car engines make CO2 and trees absorb CO2. By running your engine you're feeding a tree and helping the environment.
|
|
Total posts: 4134
Last post: Oct 13, 2020 Member since:Oct 8, 2011
|
Cars in Garage: 0
Photos: 0 WorkBench Posts: 0 |
|
Like cats more than one way, I have no idea how many clutch housings I have on hand. I use my welder for the job. Run a bead of weld around the inside of the first motion shaft outer support bearing outer race. Flip housing over and drop on welding table should fall out. I also have a 1/2 X 2 by 12 inch more less with a 1/2 inch hole in center. I grind the points off the blot head till it just fits in the bearing ( idler bearing ) carefully weld around and drop bar on and use a nut and impact to pull it out. Same as Kevin used to do. I have line of them on the conduit running down the wall behind the welding table.
As for upgrading from three to four synchro bearing I think there are three idler bearings the three synchro which was in everything for 7/8 years and perhaps many others after that. The four synchro I think was a little larger OD and same size shaft. Then the A+ larger idler came along. That one is a real improvement and they do offer a sleeve to use it with the smaller pin idler. I'm not sure how big an improvement one three and one four synchro bearing would be. If at all possible when I but a tranny I try and get the clutch housing and the drop gears and thrusts it came with. I guess if you wanted all you would use a Turbo housing with the larger first motion support bearing as well.
There are a few jobs on a mini that are a pure pain. Special tools can be bought, made or found to work. Back when people could afford to vintage race I made up a set of very long drills and jigs to drill out the oil passages in the block. Haven't used them in years but they still hang on the wall by the milling machine. Steve (CTR)
|
|
Total posts: 10237
Last post: Apr 9, 2024 Member since:Mar 24, 1999
|
Cars in Garage: 0
Photos: 0 WorkBench Posts: 0 |
|
A puller you can make or modify is always the gentlest way to get them out. I have a goofy old hydraulic lifter puller that just fits inside the bearing, but most of the time it's not heavy-duty enough, so the grinder.... I made a puller for the big A+ bearings, but the smaller ones in 3 & 4 synchro pre A+.... I don't think I EVER reused a 3-synchro housing, just changed to the 4-synchro with the slightly bigger idler bearing... highly advisable if running a 1275 or bigger with a 3-sync box....
What's the point in that ?
You only have to buy a bearing adaptor and run the smaller idler gear bearing anyway - the bearing has to match the case not the gear.
Without checking a casing in the garage or shed, does the clutch housing have a circlip retaining the bearing like the gearbox does ?
You'll struggle to remove the bearing with it in place if it has one...
|
|
Total posts: 8645
Last post: Dec 16, 2020 Member since:Oct 27, 2000
|
Cars in Garage: 0
Photos: 0 WorkBench Posts: 0 |
|
But what advice do you have for getting the new bearing installed?
They are flimsy. You need to support them, and keep them square during fitment.
I use an old idler gear and a hammer to tap them in, checking squareness during the process. Then I use a suitable size socket and extension bar, tap it in so it's just below flush.
Kevin G
1360 power- Morris 1300 auto block, S crank & rods, Russell Engineering RE282 sprint cam, over 125HP at crank, 86.6HP at the wheels @7000+.
|
|
Total posts:
Last post: Mar 25, 2022 Member since:Sep 4, 2000
|
Cars in Garage: 0
Photos: 3 WorkBench Posts: 0 |
|
But what advice do you have for getting the new bearing installed?
|
|
Total posts: 9241
Last post: Aug 17, 2023 Member since:Jun 5, 2000
|
Cars in Garage: 0
Photos: 0 WorkBench Posts: 0 |
|
When I couldn't get them out of my car I took the cover and carefully marked the far side. I drilled and bottom tapped 2 holes where the bearing shell was and put either 8-32 or 10-32 screws in (don't remember which size). I tightened screws to push the bearing out. When I was done, I put thread sealant on set screws and installed them in the tapped holes as plugs.
|
|
Total posts: 8645
Last post: Dec 16, 2020 Member since:Oct 27, 2000
|
Cars in Garage: 0
Photos: 0 WorkBench Posts: 0 |
|
I used to MIG weld a bolt in then pull it out. Now, I've made a puller, more details are in the other bearing thread on here recently.
[edit] link to other thread-
//www.minimania.com/msgThread/116160/1/1/removing_tricky_bearings
Kevin G
1360 power- Morris 1300 auto block, S crank & rods, Russell Engineering RE282 sprint cam, over 125HP at crank, 86.6HP at the wheels @7000+.
|
|
Total posts: 1087
Last post: Sep 15, 2023 Member since:Nov 3, 2011
|
Cars in Garage: 0
Photos: 0 WorkBench Posts: 0 |
|
A puller you can make or modify is always the gentlest way to get them out. I have a goofy old hydraulic lifter puller that just fits inside the bearing, but most of the time it's not heavy-duty enough, so the grinder.... I made a puller for the big A+ bearings, but the smaller ones in 3 & 4 synchro pre A+.... I don't think I EVER reused a 3-synchro housing, just changed to the 4-synchro with the slightly bigger idler bearing... highly advisable if running a 1275 or bigger with a 3-sync box....
|
|
Total posts: 1557
Last post: Sep 26, 2016 Member since:Nov 24, 2012
|
Cars in Garage: 0
Photos: 0 WorkBench Posts: 0 |
I was going to say something about WD-40 but then thought better about it
|
|
Total posts: 367
Last post: Jul 19, 2022 Member since:Jun 18, 2014
|
Cars in Garage: 0
Photos: 0 WorkBench Posts: 0 |
Thanks for all of the advise. After heating with a propane torch and breaking all of the bearings and inner cage out I was left with only the outer shell. I had to custom grind my puller even smaller to fit underneath the backside of the outer shell. I then heated it once again for two minutes and proceeded with the slide hammer about 150 blows. It came out .1mm at a time but I got it out. Thanks for the advise and the die grinder was the next step.
Randy
|
|
Total posts: 1087
Last post: Sep 15, 2023 Member since:Nov 3, 2011
|
Cars in Garage: 0
Photos: 0 WorkBench Posts: 0 |
|
The smaller 3-synchro bearings don't have enough mass... I've NEVER had one come out after heating or cooling! But the die-grinder ALWAYS works!
|
|
Total posts: 1352
Last post: Mar 29, 2024 Member since:Aug 8, 2002
|
Cars in Garage: 0
Photos: 0 WorkBench Posts: 0 |
|
Another old standby for this problem is to boil a gallon or two of water. Pour the water into and over the transfer gear case then flip the case over and slam it firmly on a couple of boards on the ground. The bearing should fall out.
Kelley
"If you can afford the car, you can afford the manual..."
|
|
Total posts: 5840
Last post: Nov 1, 2019 Member since:Nov 12, 1999
|
Cars in Garage: 0
Photos: 0 WorkBench Posts: 0 |
|
From your present position, simply destroy the bearing with a die grinder. The slight removal of material from the housing where the bearing is held will have no problems. Break the top of the bearing and knock the rollers out and then grind through the side in one spot.
And while I don't think it does the smaller ones, here is a photo for you to get all envious:
|
|
Total posts: 13978
Last post: Jan 15, 2024 Member since:Jan 22, 2003
|
Cars in Garage: 4
Photos: 381 WorkBench Posts: 1 |
|
Try sticking the whole thing in the oven for a while. Idea being the aluminium will expand quicker than the bearing ( I think ), then lay a couple of planks down and whack the case on the wood....(with the bearing over the void of course )...or try the slide right out of the oven
"Everybody should own a MINI at some point, or you are incomplete as a human being" - James May
"WET COOPER", Partsguy1 (Terry Snell of Penticton BC ) - Could you send the money for the unpaid parts and court fees.
Ordered so by a Judge
|
|
Total posts: 367
Last post: Jul 19, 2022 Member since:Jun 18, 2014
|
Cars in Garage: 0
Photos: 0 WorkBench Posts: 0 |
I am having a hell of a time getting the bearing out of my transfer case. I have a three synchro gearbox and a 1.06" diameter idler bearing. I cannot get the bearing out with a puller with a slide hammer, screwdriver or anything. Now I'm starting to maul it and bend it up. I tried icing it down in a snowbank, then hammering the backside. I also tried heating around the area and prying to no avail. The last resort is to grind it out with a die grinder but I don't want to wreck the aluminum housing. Thoughts!


