Hi Gang, it's Brendan from Mini Mania and today we're going to show you a pretty cool product that we think that you will like: MINI Cooper Puddle Light Kit.
The new MINI Coopers as well as the Classic Mini Coopers, have a legacy for being Cars that were very customizable. Cars that you can personalize. The new MINI’s are no exception.
There's lots of things that you can do with the new MINI Cooper's to personalize them and make them your own and we have a really fun product to show you guys today.
Well, this is what the MINI Cooper Puddle Light looks like. This is the Aftermarket Puddle Light and as you can see the OEM one would normally just be this little bit here, but this has got this added little Projection Lens.
Inside, you have what, effectively, is like a little Slide that gets projected onto the ground. This particular one is the MINI Wings logo and these just come in and out and you can actually change those and personalize it as you would.
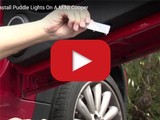
Now today we've got our R58 Coupe up on Jack Stands. It gives us a little bit more access to get up underneath the door for shooting purposes. You may or may not actually need to do that to get more room, but you will have to, probably, lie on your back anyway with the door open.
So you don't want to do that on the traffic side of the road. You want to be safe when you're doing this. I know that it's not a real difficult installation, because really all you're doing is just removing the Factory Light, you're installing this one and you've basically just one electrical connection.
Now we've already gone ahead and we've removed the Negative Battery Cable, so any time you work on anything Electrical on any car, just disconnect the Battery first so that you don't get any shorts, don't blow any fuses and you don't blow up any new products.
These are LED lights, so they are a little different than the OEM ones- the original, I believe, is an incandescent bulb. There is one caveat about these; you don't want to leave your doors open for a long period of time. You don't want to leave them open, for more than say five minutes or so. Just to save the bulb life for these little guys.
So we're going to show you how these go in and we're going to that right now.
OK- in order to remove the Factory Light, basically, you just use either a plastic spudger Tool or if you just have a small Flat Bladed Screwdriver, you can just reach under and just pop the lights out just like that.
Don't yank too much on this side, because that's where your electrical connection is. Then to disconnect the electrical you basically just want to grab the black end, give it a squeeze and then the light will just come right off. So there you go.
So there's your OEM one. So this is our Aftermarket Puddle Light here, and we're going to install this- but before we can do that we're going to take an Exacto Knife and we're actually going to clear out the opening here because there are a couple Tabs that stick out from the sides, that don't interfere with the Factory Light but they will interfere with the Aftermarket when going up into the opening.
So, you just have to take an Exacto Knife and cut off those tabs flush with the edge and then you can connect the Electrical and pop that in. I'll show you how to trim those off right now.
I just got a Exacto Knife here. I'm just going to run it along the edge and I'm just going to trim off this tab. I've already done the one on the opposite side. We're just, basically, going to make this so that this entire side here is flush and we don't have that protruding out into the opening. You should be able to fit the Puddle Light without any issues, with your finger.
Careful of the Wires, you don't want to stick your blade through the Wires. They are only on the one end, so you shouldn't really have that as a problem. So, let's see-that should be good. Now then we can just connect it, plug it in.
OK, so now that we've trimmed our opening- we have our replacement Puddle Light- and what we're going to do is, we're first going to connect the electrical connection here. Remember we have removed our battery cable, so that we're not going to short anything out.
Once that's connected, we're just going to put this in the opening carefully and we're just going to snap it right in. That's all you got to do. It's done.
Now, if you Light is projecting- if you need to orient it in a different way- you can actually rotate the barrel inside the light and you can actually change the orientation of the way that it's displaying.
So in order to adjust it, that's all you need to do. We've reconnected up our battery and you can see our little MINI Wings logo there and you, basically, just want to pull this out enough so that you can rotate your image and then once you get it sort of where you want it like that, it’s done, just pop it back in.