Hi, Gang it's Brendan from Mini Mania. Today we're going to do a video showing us swapping out our Stock front Brake Pads and Rotors on our JCW Coupe, which is right there. We're going to be using the EBC Yellow Pads. These are part number G2NMB2048 for the front. I believe the G2NMB2049's are for the rears.
These are the Upgraded Slotted and Drilled Rotors that we're going to be putting on the Car. The part number on those is G2NMB3004 and we're going to get to that right now. We'll show you all of the steps.
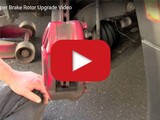
All right here we have the first step, we have the Wheel off the Car. We're going to just knock out the Pins. Gently spread open the Brake Pads and pull them out.
TONY: OK, THe Spring should pop right out.
BRENDAN: We'll show you the orientation of that Spring, when the new ones go back in. We've got a piece of wood that we cut that's about the same size as the Brake Pads. Since we're replacing the Rotor we don't need to worry about marring it. We're just going to put that in there and we're just going to sink those Dual Pistons right back in the bore, on both sides.
TONY: I'm going put a piece of Wire to hang the Caliper from.
BRENDAN: You can use a Bungee cord or whatever.
TONY: Whatever works best- it shouldn't hang it from the Brake Hose, bottom line.
BRENDAN: 15 Millimeter, roughly 5/8".
TONY: 15 Millimeter 5/8" will work.
TONY: OK, I'm going to remove my Rotor. Number 50 Tourques.
BRENDAN: We're checking it with a Wheel Bolt, just to make sure they were lined up correctly.You can put those on thread one or two- before hand- if you want to, good to check 'em. Now we're going to put new Brake Pads in this Caliper and put this Caliper back on.
TONY: I'm going to do this hand tight for now, we're not going to tighten these Caliper Bolts yet.
TONY: The Sensor is only on one side?
BRENDAN: The Wired Sensor is only on the driver side, on the Left Hand Drive Car.
TONY: These have already been collapsed-I'm going to collapse the other side now. OK, very little pressure, Yeah- see how it goes in so nicely. The Calipers there, pull the block out, set the new Pad in there. Now my Clip. You can see, the Clip has a longer end-it goes up here at the top.
BRENDAN: The Clip is held in place by the Pins that go through which, also, are going to secure the Pads.
TONY: Pin's coming from the back side.
BRENDAN: It's a bit of a trick getting all this lined up.
TONY: Basically, you want to take the tension off the clip by pushing on the Clip. This is where it gets tricky. Ok, it's all the way in.
BRENDAN: Now we tighten the Rear Caliper Bolts. OK, We're done.